Mar 31, 2018

Oracle 12c SOA Suite: Administration via Enterprise Manager

After

i want to present some screenshots of the web console of the SOA Suite:
http://localhost:7001/em
But first the servers have to be started:
cd /home/oracle/Oracle/Middleware/Oracle_Home/user_projects/domains/base_domain/bin
nohup ./startNodeManager.sh &
nohup ./startWeblogic.sh &
Now the login is available:

 But there the soa_server1 is still down:


 So let's start this one:
nohup ./startManagedWebLogic.sh soa_server1 http://192.168.178.49:7001
The icon left to "base_domain" (beneath the oracle logo at the top) is the menu:


If you navigate to "soa-infra(soa_server1) you get this frame:


Mar 24, 2018

Oracle SOA Suite 12c: Tokens - To avoid substituting values: define global token variables

Inside the Enterprise Manager (URL: http://yourhost:7001/em) you can configure SOA Suite profiles:

Choose "Token Configurations"

 ???

To list the tokens click on "Modify Configuration file":

 To add a token click on the green plus:

 Do not forget to save your changes:


To use the bulk append you have to create a file like this one:


    2000
    weblogic
Choose your file "text.xml":
 and click on "Append":


Mar 22, 2018

Java 10 released: java with some enhancements for running inside docker

After the release of Java 9 in october 2017 with its new features
Oracle released Java 10:
 A short summary of the new feature can be found
at https://blogs.oracle.com/java-platform-group/introducing-java-se-10
or you can take a look a the release notes:
http://www.oracle.com/technetwork/java/javase/10-relnote-issues-4108729.html#NewFeature

My favourites are:
  • JEP 307 Parallel Full GC for G1  Improves G1 worst-case latencies by making the full GC parallel. The G1 garbage collector is designed to avoid full collections, but when the concurrent collections can't reclaim memory fast enough a fall back full GC will occur. The old implementation of the full GC for G1 used a single threaded mark-sweep-compact algorithm. With JEP 307 the full GC has been parallelized and now use the same amount of parallel worker threads as the young and mixed collections.
and the docker enhancements:
  • JDK-8146115 Improve docker container detection and resource configuration usage
The JVM has been modified to be aware that it is running in a Docker container and will extract container specific configuration information instead of querying the operating system. The information being extracted is the number of CPUs and total memory that have been allocated to the container. The total number of CPUs available to the Java process is calculated from any specified cpu sets, cpu shares or cpu quotas. This support is only available on Linux-based platforms. This new support is enabled by default and can be disabled in the command line with the JVM option:
-XX:-UseContainerSupport
In addition, this change adds a JVM option that provides the ability to specify the number of CPUs that the JVM will use:
-XX:ActiveProcessorCount=count
This count overrides any other automatic CPU detection logic in the JVM.
  • JDK-8186248 Allow more flexibility in selecting Heap % of available RAM
Three new JVM options have been added to allow Docker container users to gain more fine grained control over the amount of system memory that will be used for the Java Heap:
-XX:InitialRAMPercentage
-XX:MaxRAMPercentage
-XX:MinRAMPercentage
These options replace the deprecated Fraction forms (-XX:InitialRAMFraction, -XX:MaxRAMFraction, and -XX:MinRAMFraction).
  • JDK-8179498 attach in Linux should be relative to /proc/pid/root and namespace aware
This bug fix corrects the attach mechanism when trying to attach from a host process to a Java process that is running in a Docker container.
Related posts:

Oracle VM Server x86: Discovering a server/node + setting up a repository, server pool and networking

Let's put the things together:
The Oracle VM Manager has to discover the node. Inside the web GUI (https://yourhost:7002/ovm/console)  clickt on the right icon:

Then give your password and the ip(s):

And then you can see the node details (if the connections does not fail):

The next step is to create a repository. To achieve this, you have to add a additional hdd on the oracle VM server/node, without mounting this on the server/node.
Then disover the local storage:
After "rescan phyiscal disks" it is possible to create a repository:


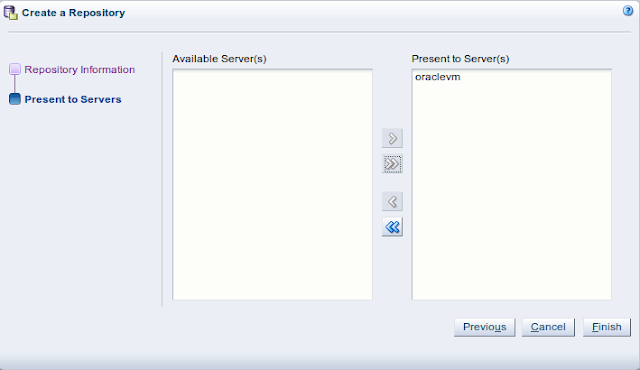
Still something missing: a server pool:


 Attention: Uncheck the "Clustered Server Pool" option:


And last but not least: networking...

Check, that your network is available for "Virtual Machine"

 Next posting i will show the creation of a virtual machine...

Mar 17, 2018

AVM: Powerline Repeater / Fritz Repeater

Last weekend my Powerline Adpater 546E broke. I tried some restarts but after 1-5 minutes the WLAN went down and the adapter got really hot.

Perhaps the missing mesh functionality was due to a hardware problem which caused this total failure.

Never mind. I ordered a Fritz Box Repeater 1160 and followed the instructions from AVM:
Note: If your repeater is already connected to your FritzBox and you perform the firmware update >6.90, then you have to do the integration via WPS once again (enable WPS on your FritzBox, then press WPS button on the repeater).

After that everything was like expected:

Mar 10, 2018

Docker-CE on Ubuntu 17.10 (Artful Aardvark) (2)

Three months ago i installed docker on my ubuntu 17.10. At those days there was no straight forward howto on docher.com.

Now the installation is listed on docker.com:


The installation manual can be found here.

root@zerberus:~# apt-get install apt-transport-https ca-certificates curl   software-properties-common
root@zerberus:~# curl -fsSL https://download.docker.com/linux/ubuntu/gpg | sudo apt-key add -
  OK
root@zerberus:~# apt-key fingerprint 0EBFCD88  pub   rsa4096 2017-02-22 [SCEA]
      9DC8 5822 9FC7 DD38 854A  E2D8 8D81 803C 0EBF CD88
  uid        [ unbekannt ] Docker Release (CE deb)
sub   rsa4096 2017-02-22 [S]
root@zerberus:~# add-apt-repository \
>    "deb [arch=amd64] https://download.docker.com/linux/ubuntu \
>    $(lsb_release -cs) \
>    stable"
root@zerberus:~# apt update

root@zerberus:~# apt install docker-ce
And then a check:
root@zerberus:~# docker versionClient:
 Version:    17.12.0-ce
 API version:    1.35
 Go version:    go1.9.2
 Git commit:    c97c6d6
 Built:    Wed Dec 27 20:11:14 2017
 OS/Arch:    linux/amd64

Server:
 Engine:
  Version:    17.12.0-ce
  API version:    1.35 (minimum version 1.12)
  Go version:    go1.9.2
  Git commit:    c97c6d6
  Built:    Wed Dec 27 20:09:47 2017
  OS/Arch:    linux/amd64
  Experimental:    false

Related posts:

Mar 8, 2018

Oracle VM Server x86: Installing Oracle VM Manager (getting the installation media)

If you search for "oracle vm manager" on Oracle Edelivery you will get the following:
 Hmmm...
Downloading "Oracle VM Manager with Oracle Linux 2.2.0.0.0" will lead to two files with *.img. These files are no cd/dvd images. But you can find a solution here:

mount -t auto -o loop,offset=$((63*512)) System.img /mnt/System
But this leads to some files with oc4j containers. 

So DO NOT search for "Oracle VM Manager". Use as search string only "VM Manager" and here we go:

Use the "Oracle VM Manager 3.4.4" at the bottom of the page...
(The installation can be found in this posting)

Oracle VM Server x86: Installing Oracle VM Manager

First check the hardware requirements:


After downloading the right image (please do not laugh, this is really a problem), inside a Oracle Linux the following steps have to be done:

mount /dev/cdrom /mnt
mount: /dev/sr0 is write-protected, mounting read-only
and
# ls /mnt/
components       oracle-validated.params  OvmSDK_3.4.4.1709.zip  sample.yml
createOracle.sh  ovmm-installer.bsx       runInstaller.sh        TRANS.TBL
First try:
[root@localhost ~]# /mnt/createOracle.sh
Missing required package, Oracle VM Manager requires 'iptables-services' to be installed, you can use 'yum install iptables-services' to install it.
Ok:
[root@localhost ~]# yum install iptables-services
And here we go:
# /mnt/createOracle.sh
Removed symlink /etc/systemd/system/multi-user.target.wants/firewalld.service.
Removed symlink /etc/systemd/system/dbus-org.fedoraproject.FirewallD1.service.
Created symlink from /etc/systemd/system/basic.target.wants/iptables.service to /usr/lib/systemd/system/iptables.service.
Adding group 'oinstall' with gid '54321' ...
Adding group 'dba'
Adding user 'oracle' with user id '54321', initial login group 'dba', supplementary group 'oinstall' and  home directory '/home/oracle' ...
Changing ownership of '/home/oracle' to oracle:dba
Creating user 'oracle' succeeded ...
For security reasons, no default password was set for user 'oracle'. If you wish to login as the 'oracle' user, you will need to set a password for this account.
Verifying user 'oracle' OS prerequisites for Oracle VM Manager ...
oracle    soft    nofile        8192
oracle    hard    nofile        65536
oracle    soft    nproc        2048
oracle    hard    nproc        16384
oracle    soft    stack        10240
oracle    hard    stack        32768
oracle    soft    core        unlimited
oracle    hard    core        unlimited
Setting  user 'oracle' OS limits for Oracle VM Manager ...
Altered file /etc/security/limits.conf
Original file backed up at /etc/security/limits.conf.orabackup
Verifying & setting of user limits succeeded ...
Creating mountpoint '/u01' ...
Modifying iptables for OVM
Adding rules to enable access to:
     7002  : Oracle VM Manager https
       123 : NTP
     10000 : Oracle VM Manager CLI Tool
Redirecting to /bin/systemctl status iptables.service
Redirecting to /bin/systemctl restart iptables.service
iptables: Saving firewall rules to /etc/sysconfig/iptables:[  OK  ]
Redirecting to /bin/systemctl restart iptables.service
Rules added.
Before starting the "runInstaller.sh" i had to install the following packages:
yum install zip unzip net-tools perl-Data-Dumper
But then:
[root@localhost ~]# /mnt/runInstaller.sh

Oracle VM Manager Release 3.4.4 Installer

Oracle VM Manager Installer log file:
/var/log/ovmm/ovm-manager-3-install-2018-02-22-163152.log

Please select an installation type:
   1: Install
   2: Upgrade
   3: Uninstall
   4: Help

   Select Number (1-4): 1

Verifying installation prerequisites ...


And ready for login: