Showing posts with label Linux. Show all posts

Jan 22, 2023

Openssl: How to automate (without hitting the carriage return many times)

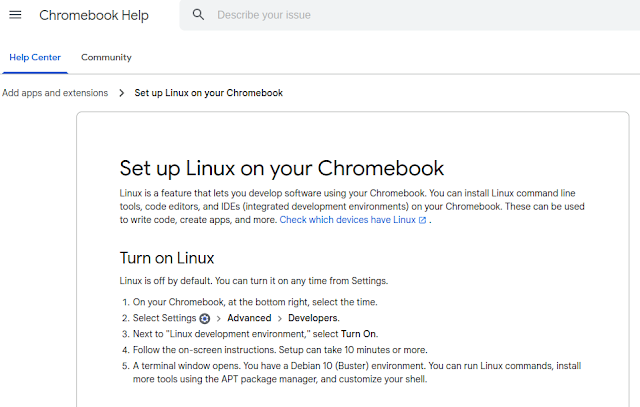
I think nearly everyone, who administers some PCs or servers has used openssl. And almost everything there is straight forward.

To create your own key and certificate, just run:

openssl req -x509 -sha256 -nodes -days 365 -newkey rsa:2048 \
-keyout privateKey.key -out certificate.crt


............+..+.+.................+............+.+......+........+.+++++++++++++++++++++++++++++++++++++++++++++++++++++++++++++++++*.+....................+......+.+++++++++++++++++++++++++++++++++++++++++++++++++++++++++++++++++*.......+.+.....+...+..........+...............+....................+.+...+..+..........+........+......+.+...+.....+...+.......+..+.+...+...........+....+..+.......+.....+...............+................+......+......+...+......+...+...+..+......+......+.........+....+........+............+..........+.....+...+.......+..+...+.............+...+......+..............+....+...........+....+..+.+..+...+.............+............+...+..+.........+...+...............+...+..........+.........+...+...+...+...............+.........+..+++++++++++++++++++++++++++++++++++++++++++++++++++++++++++++++++
..........+.....+.......+.........+..+.............+.....+++++++++++++++++++++++++++++++++++++++++++++++++++++++++++++++++*.......+.............+.........+..+....+..+...+.+......+...+.....+.........+.+.....+.+.....+...+.+.....+++++++++++++++++++++++++++++++++++++++++++++++++++++++++++++++++*..+......+............................+.....+....+..+++++++++++++++++++++++++++++++++++++++++++++++++++++++++++++++++
-----
You are about to be asked to enter information that will be incorporated
into your certificate request.
What you are about to enter is what is called a Distinguished Name or a DN.
There are quite a few fields but you can leave some blank
For some fields there will be a default value,
If you enter '.', the field will be left blank.
-----
Country Name (2 letter code) [AU]:
State or Province Name (full name) [Some-State]:
Locality Name (eg, city) []:
Organization Name (eg, company) [Internet Widgits Pty Ltd]:
Organizational Unit Name (eg, section) []:
Common Name (e.g. server FQDN or YOUR name) []:
Email Address []:
But the problem with that approach:

You have to add the carriage returns for every line after the 5 dashes and then your certificate looks quite ugly (see red colored text):

openssl x509 -text -in certificate.crt -noout


Certificate:
    Data:
        Version: 3 (0x2)
        Serial Number:
            0b:01:9a:aa:f1:59:69:33:84:7e:cf:89:69:0c:d5:80:61:82:b5:28
        Signature Algorithm: sha256WithRSAEncryption
        Issuer: C = AU, ST = Some-State, O = Internet Widgits Pty Ltd
        Validity
            Not Before: Jan 22 15:54:43 2023 GMT
            Not After : Jan 22 15:54:43 2024 GMT
        Subject: C = AU, ST = Some-State, O = Internet Widgits Pty Ltd
        Subject Public Key Info:
            Public Key Algorithm: rsaEncryption
                Public-Key: (2048 bit)
                Modulus:
                    00:c6:7d:5a:9f:97:3d:43:9b:e0:19:2f:46:31:5c:
                    82:f0:42:ac:da:a9:e8:d0:91:e0:01:98:05:52:cf:
                    1c:4e:77:53:1a:96:5c:6a:6f:ca:5c:61:a4:5f:14:
                    12:ed:69:ae:50:bb:99:28:48:df:bc:f6:76:c1:63:
                    2b:51:55:ad:bb:62:9f:3a:2b:1f:e7:c3:fd:bb:45:
                    04:c3:88:ee:b1:ba:c6:e2:f7:f1:80:5b:ef:eb:04:
                    fb:ec:82:89:39:c6:33:68:0d:3e:36:62:36:e0:a0:
                    ff:21:5f:74:ad:d2:4b:d4:5d:c4:67:6b:90:a0:8f:
                    1e:4c:80:31:30:2e:8e:5e:9d:62:8a:1d:45:84:5f:
                    d3:09:46:fe:4f:8d:68:c6:54:e4:51:da:e0:64:f8:
                    5d:af:01:2e:79:0c:fe:0b:0f:d6:2e:1b:e6:eb:09:
                    ca:cc:16:3d:92:53:ae:3b:ad:da:67:a5:ef:69:30:
                    7f:e7:53:7c:dd:23:59:c8:8c:6b:b0:a9:fa:fc:4c:
                    c1:44:cf:3f:2f:91:f4:8c:b6:7c:d9:ae:82:6d:96:
                    aa:bb:51:07:3c:2b:12:24:e4:a3:7d:9b:ee:4b:7e:
                    f4:02:0e:bc:b4:35:bd:73:dc:6b:b4:34:36:57:48:
                    72:f2:91:60:2d:79:d9:44:3c:77:76:eb:c7:8a:00:
                    5f:75
                Exponent: 65537 (0x10001)
        X509v3 extensions:
            X509v3 Subject Key Identifier:
                F1:77:6C:19:76:FB:E4:DD:50:2A:1E:01:BE:A1:5C:48:3D:5A:40:68
            X509v3 Authority Key Identifier:
                F1:77:6C:19:76:FB:E4:DD:50:2A:1E:01:BE:A1:5C:48:3D:5A:40:68
            X509v3 Basic Constraints: critical
                CA:TRUE
    Signature Algorithm: sha256WithRSAEncryption
    Signature Value:
        8a:28:28:12:6c:1e:e5:54:86:9b:6e:90:7a:ca:aa:a7:a1:b3:
        b1:43:02:44:e8:9a:59:b2:d6:6e:36:c6:51:3b:9b:f4:91:47:
        40:6f:cf:6d:de:86:8d:dd:2f:9e:44:4c:f8:d3:5a:d3:3a:ef:
        d5:0d:e1:10:b6:64:34:ee:03:4a:f2:de:ff:da:db:a3:93:20:
        13:85:2a:d6:9b:b2:0e:2c:2e:9c:f9:71:ff:32:3b:c3:6b:0a:
        e7:98:2d:30:c9:a6:47:b7:72:84:bb:52:23:11:d6:b7:90:cb:
        98:cd:59:16:b5:8f:70:46:c1:95:90:01:2f:7f:9c:22:ac:29:
        8d:14:97:76:dd:06:56:f8:22:9d:f4:00:9f:40:3c:fb:c2:95:
        63:48:50:ee:ad:17:1b:54:6b:60:0c:d5:3e:66:3b:00:0e:7a:
        33:99:cc:4a:f6:dc:d1:e3:40:ea:8c:66:df:7e:92:e1:a5:e5:
        72:0e:89:ba:87:43:0c:56:70:8c:f2:9b:77:dd:ca:03:8e:24:
        fd:6b:51:d2:3b:b2:df:e4:ff:c2:3c:cb:ab:2e:cd:82:f4:69:
        ad:a3:81:d7:95:d0:68:e1:3f:fc:50:4d:8b:14:b2:82:8c:19:
        2b:06:8a:0e:ef:21:4b:68:4f:e3:1d:53:64:62:97:c8:35:45:
        01:54:d9:10


To avoid that you have just to expand your command with the following parameters:

openssl req -x509 -sha256 -nodes -days 365 -newkey rsa:2048 \
-keyout privateKey.key -out certificate.crt \
-subj "/C=de/CN=schroff.special/OU=MyDepartment"

Typical attributes can be found here:

(Common Name, Organization, Organizational Unit, Country, Location)


Nov 9, 2022

FritzBox monitoring with telegraf, influx and grafana

On year ago i wrote about adding a FritzBox to my monitoring with grafana and influxdb: https://dietrichschroff.blogspot.com/2021/11/fritzbox-monitoring-with-grafana-influx.html

This was done with collectd.

As i wrote in https://dietrichschroff.blogspot.com/2022/09/ubuntu-raspberry-pi-upgrade-to-2204.html i upgraded my raspberry to 22.04 and along with many minor problems, collectd was gone. (and i think it will not be added anymore.)

All other monitorings use telegraf to get the data.

And there is a solution, which provides that:

https://github.com/Schmidsfeld/TelegrafFritzBox/

You can follow the steps on this page. If you get no data - here is the commandline which you should use to test the connection:

python3 ./TelegrafFritzBox/telegrafFritzBox.py -p xxxxxx -i 192.168.178.1 -u fritz8490

And this should be the command, which you use in 

/etc/telegraf/telegraf.d$ cat telegrafFritzBox.conf

The reward is really a very nice dashboard:


Nov 5, 2022

Installation and running RaceResult Presenter.exe on Ubuntu

For all who are active in sports and want to run a event with www.raceresult.com:

In our case we have some Linux laptops which we want to use (Windows OS licenses missing).

RaceResult consists some some components

  • SEServer2.exe
  • Presenter.exe
  • CameraServer.exe
  • Transponder.exe
  • Moderator.exe
  • RRWS.exe

We want to run the Presenter.exe on a Linux box. So first step:

Install raceresult software with wine.

Preinstallation step:

winetricks vb6run

Installation step:

wine raceresult_12.4.25.0_386_stable.exe

(the exe is provided by raceresult)

Important thing: to run the Presenter.exe you need the SEServer2.exe running as well. Because RaceResult decided to let this server listen on port 1023, the installation has to be done twice. One with sudo and one without.

For the sudo installation please select all components. For the user installation only the presenter is needed (but you can go with all as well):

Then: start the SEServer 

sudo bash
cd /root/.wine/drive_c/Program Files (x86)/race result/race result 11/SEServer2
wine SEServer2.exe

Startup the presenter as well

cd ~/.wine/drive_c/Program Files (x86)/race result/race result 11/Presenter
wine Presenter.exe

Now the next tricky thing: You got a ses file from raceresult (rot.ses). Copy this in both .wine directories to ./wine/drive_c and the open this ses file in the presenter:


Bam done. :)

Sep 28, 2022

Ubuntu raspberry pi: upgrade to 22.04...

Ubuntu released version 22.04 so i decided to make an update from

Ubuntu 21.04 (GNU/Linux 5.11.0-1027-raspi aarch64)

to

Ubuntu 22.04.1 LTS (GNU/Linux 5.15.0-1015-raspi aarch64)

But this was not so easy as i thought. Running on my raspberry pi the following services were running:

  • influxdb
  • collectd
  • telegraf
  • mosquitto
  • zigbee2mqtt
  • grafana

Without any problem only grafana was updated.

Collectd failed with this message:

Package 'collectd' has no installation candidate

no chance to fix that :(

With that i had to disable the collectd section in influxdb - with that session it failed with 

influxd-systemd-start.sh[2293]: run: open server: open service: Stat(): stat /usr/share/collectd/types.db: no such file or directory

Then zigbee2mqtt was not able to write to mosquitto. This is due a change of the default settings of mosquitto. allow_anonymous false is now default, so i had to add

allow_anonymous true

After that zigbee2mqtt was able to write data to mqtt again.

Last thing: restart of telegraf, because just did not start properly after the first reboot after the upgrade.

Not really a good update - my other raspberry pi will stay on 21.04 for some more months...

Dec 27, 2021

Running a movie on an external DVD drive on a Chromebook (like HP x360)

In a first step this task sounds very easy:

  • watch a DVD on a chromebook

But...

What are the problems?

  1. Using an external drive to access the dvd
  2. No appropriate app available in play store or chrome web store

There are different solutions out there. 

  1. Convert the DVD to a mp4 and watch this
  2. Use VLC from play store --> does not recognize the DVD
  3. Use VLC from chrome web store --> does not start at all
  4. Use linux development environment

Option 4 seemed to me as the most promising way to go.

Setting up linux is very easy:

 After that you have a debian bullseye running inside a container. Go to /etc/apt/sources.list and add "contrib" after "deb https://debian.org/debian bullseye main " ("sudo bash" to get root). Then 

apt update
apt upgrade
apt install vlc libdvd-pkg
dpkg-reconfigure libdvd-pkg

After that vlc is configured including the libdvdcss for the DVD region codes.

One last problem is to access the DVD inside this linux container. This can be done via a double tap inside the file-manager on the chromebook and then you can choose inside the context menu "share with linux (Mit Linux teilen)".

This last step has to be done each time a DVD is inserted. 

So watching DVDs on a chromebook is not impossible, but it is not really user friendly...


Dec 4, 2021

influxdb: copying data with SELECT INTO - pay attention to the TAGS (or they are transformed to fields)

 If you are using influxdb, one usecase could be, copy the data from a measurement ("table") to another.

This can be done with this statement:

select * into testtable2 from testtable1

By the way: the CLI is opened with

/usr/bin/influx -unsafeSsl -ssl -database telegraf
(if your database is named telegraf)

In my case (zigbee / mqtt / telegraf) the layout of mqtt_consumer measurement was like this:

> show tag keys from mqtt_consumer
name: mqtt_consumer
tagKey
------
host
topic
> show field keys from mqtt_consumer
name: mqtt_consumer
fieldKey    fieldType
--------    ---------
battery     float
contact     boolean
current     float
...
But after copying this to a testtable, the tags where gone and everything was a field. 

This is not a big problem - you can work with that data without a problem. BUT if you want to copy it back or merge it to the original table, you will get a table with the additional columns host_1 and topic_1.

This is because for influx you already had a column host. So it added a column field host_1. 

If a query in this new table (with host + host_1) spans over a time where both of this columns are in, you only select the data, with the entry host. If the time spans only entries with host_1, it is shown as host and you get your data. Really a unpredictable way to get data.

What is the solution? Easy:

select * into table1 from mqtt_consumer group by host,topic
The "group by" does not group anything. It just tells influx: host & topic are tags and not fields. Please do not transform them...


Nov 26, 2021

Raspberry PI on Ubuntu: yarn: Cannot find module 'worker_threads'

This evening i tried to install a nodejs application with yarn on my raspberry pi. This failed with:

/usr/local/bin/yarn install
internal/modules/cjs/loader.js:638
    throw err;
    ^
Error: Cannot find module 'worker_threads'
    at Function.Module._resolveFilename (internal/modules/cjs/loader.js:636:15)
    at Function.Module._load (internal/modules/cjs/loader.js:562:25)
    at Module.require (internal/modules/cjs/loader.js:692:17)
    at require (internal/modules/cjs/helpers.js:25:18)
    at /opt/zwavejs2mqtt/.yarn/releases/yarn-3.1.0-rc.8.cjs:287:2642
    at Object.<anonymous> (/opt/zwavejs2mqtt/.yarn/releases/yarn-3.1.0-rc.8.cjs:585:7786)
    at Module._compile (internal/modules/cjs/loader.js:778:30)
    at Object.Module._extensions..js (internal/modules/cjs/loader.js:789:10)
    at Module.load (internal/modules/cjs/loader.js:653:32)
    at tryModuleLoad (internal/modules/cjs/loader.js:593:12)

This error occurs because the nodejs version which is delivered by ubuntu is version v.10.19.0.

You have to download the armv8 package from https://nodejs.org/en/download/

With version v16.13.0 the error was gone...


Nov 6, 2021

Fritz!Box monitoring with grafana, influx, collectd and fritzcollectd

 A nice way to monitor your Fritz!Box is this here:


How can you achieve this:

https://fetzerch.github.io/2014/08/23/fritzcollectd/

and 

https://github.com/fetzerch/fritzcollectd

Here a list of the software packages you have to install

apt install -y collectd python3-pip libxml2 libxml2-dev libxslt1-dev influxdb nodejs git make g++ gcc npm net-tools certbot mosquitto mosquitto-clients grafana-server

for grafana-server and influxdb you have to add new repositories, because they are still not included in ubuntu.

To tell collectd, that it shoud write to influxdb, you have to uncomment the following in collectd.conf:

<Plugin network>
        Server "localhost" "25826"
</Plugin>

and in influxdb.conf:

[[collectd]]
  enabled = true
  bind-address = "localhost:25826"
  database = "collectd"
  retention-policy = ""
  typesdb = "/usr/share/collectd/types.db"
  parse-multivalue-plugin = "split"

and of course inside collectd.conf you have to add the fritzcollectd config from the github link above.

But with starting collectd you might get the error:

dlopen("/usr/lib/collectd/python.so") failed: /usr/lib/collectd/python.so: undefined symbol: PyFloat_Type

This can be solved with adding into /etc/default/collectd:

LD_PRELOAD=/usr/lib/python3.8/config-3.8-aarch64-linux-gnu/libpython3.8.so


Zigbee: Setup zigbee2mqtt with usbstick conbee II & influxdb on a raspberry pi

Just a short walkthrough of all steps which are necessary:

1.) insert the usbstick and check if this special device is there: /dev/ttyACM0 

if this device is not showing up, it might be, that your kernel does not support usbserial. In my case i had to downgrade from ubuntu server 21.10 to 21.04.

2.) follow these steps: https://www.zigbee2mqtt.io/guide/installation/01_linux.html#installing


apt-get install -y nodejs git make g++ gcc npm
git clone https://github.com/Koenkk/zigbee2mqtt.git /opt/zigbee2mqtt
cd /opt/zigbee2mqtt
npm ci

if you get 

prebuild-install WARN install EACCES: permission denied, access '/root/.npm/_cacache'

then you should not use root for running this command.

cd /opt/zigbee2mqtt
chown -R ubuntu node_modules
rm node_modules/*
npm ci

3.) install mqtt 


apt install mosquitto mosquitto-clients

4.) add to /etc/mosquitto/mosqitto.conf the line

listener 1883 127.0.0.1

and restart mosquitto (systemctl restart mosquitto)


5.) then start the zigbee2mqtt:

cd /opt/zigbee2mqtt
npm start

 if you get

Zigbee2MQTT:error 2021-11-06 09:05:23: Error: Error while opening serialport 'Error: Error: No such device or address, cannot open /dev/ttyACM0' 

then you did not really check step 1.): please check that /dev/ttyACM0 is missing - if yes: for me the kernel module (to list: lsmod) usbserial was missing. It seems, that ubuntu missed that on 21.10 - so i reinstalled 21.04....

if you get

zigbee2MQTT:error 2021-11-06 14:54:11: MQTT failed to connect: connect ECONNREFUSED 127.0.0.1:1883

 then you did not get mosquitto running. Check with systemctl status mosquitto and follow step 3 and 4.

6.) configure telegraf, so that the data from mosquitto is transferred to influxdb. So you have to add to telegraf.conf:


[[inputs.mqtt_consumer]]
   servers = ["tcp://127.0.0.1:1883"]
   topics = [
     "zigbee2mqtt/sensor/#",
   ]
   data_format = "json"

[[outputs.influxdb]]
   urls = ["unix:///var/run/influxdb/influxdb.sock"]
   username = "admin"
   password = "XXXXX"

7.) add this user to influxdb:


influx -ssl -unsafeSsl (only influx if you have not enabled SSL)

create user admin with password 'XXXXXXX' with all privileges

8.) if you have joined a device this the zigbee2mqtt, then you have to give a friendy name inside /opt/zigbee2mqtt/data/configuration.yaml

   friendly_name: 'sensor/t1'

Mar 13, 2021

metallb on microk8s: loadbalancer ip not reachable from clients /arp issue


In my last posting i wrote, how to configure and use metallb on a microk8s kubernetes cluster. This worked fine - but on the next day i was only able to reach the loadbalancer ip from clients outside the kubernetes cluster.

So what happened?

Just two things in advance:

  • metallb does not create interfaces on the node
    That means, the loadbalancer ip does not use the OS to announce the ip inside the network
  • metallb has to use its own arp  mechanism

If a client (on the same network as the kubernetes cluster) can not reach the loadbalancer ip, you have to check the arp table.

On all kubernetes nodes (except the master) you will find the loadbalancer:

arp 192.168.178.230
Address                  HWtype  HWaddress           Flags Mask            Iface
192.168.178.230          ether   dc:a6:32:65:c4:ee   C                     eth0

On the metallb controller you will find nothing:

(The controller can be found with this command:

kubectl get all -o wide -n metallb-system
NAME                              READY   STATUS    RESTARTS   AGE   IP               NODE     NOMINATED NODE   READINESS GATES
pod/speaker-hgf7l                 1/1     Running   1          21h   192.168.178.53   ubuntu   <none>           <none>
pod/controller-559b68bfd8-tgmv7   1/1     Running   1          21h   10.1.243.224     ubuntu   <none>           <none>
pod/speaker-d9d7z                 1/1     Running   1          21h   192.168.178.57   zigbee   <none>           <none>
and on this node:

arp 192.168.178.230
192.168.178.230 (192.168.178.230) -- no entry

On the client you are using, you get the same result: no arp entry for this ip. 

Option 1: the quick fix

run arp -s 192.168.178.230 dc:a6:32:65:c4:ee on your client and after that you can reach 192.168.178.230, because your client knows, which NIC (MAC) it has to reach.

Option 2:  switch the interface on the controller to promiscuous mode.

without running the interface in promicuous, metallb can not announce the ip via arp. So run ifconfig wlan0 promisc. (https://github.com/metallb/metallb/issues/284)


Mar 12, 2021

microk8s: Using the integrated loadbalancer metallb for a application/container


Microk8s comes with an internal loadbalancer: metallb (https://microk8s.io/docs/addons)

For project status and documentation: https://metallb.universe.tf/

My problem with this addon: It is very easy to install - but i found nearly nothing about the configuration, so that is will work... 

The only source was https://opensource.com/article/20/7/homelab-metallb

So here everthing from the beginning: 

# microk8s.enable metallb

You have to add an ip range after you hit enter. This should be some ips, which are not in use and which your DHCP should not assign to other devices.
You can check this range afterwards via:

# kubectl describe configmaps -n metallb-system
Name:         kube-root-ca.crt
Namespace:    metallb-system
Labels:       <none>
Annotations:  <none>

Data
====
ca.crt:
----
-----BEGIN CERTIFICATE-----
MIIDA..........=
-----END CERTIFICATE-----

Events:  <none>


Name:         config
Namespace:    metallb-system
Labels:       <none>
Annotations:  <none>

Data
====
config:
----
address-pools:
- name: default
  protocol: layer2
  addresses:
  - 192.168.178.230-192.168.178.240

Events:  <none>
After this you have to write this yaml to connect your application to the metallb:

apiVersion: v1
kind: Service
metadata:
  name: kuard2
  namespace: kuard2
spec:
  selector:
    app: kuard2
  ports:
    - protocol: TCP
      port: 80
      targetPort: 8080
  type: LoadBalancer
Fairly easy, but if you do not know where to start, this is almost impossible. Next step is to deploy this yaml:

# kubectl apply -f loadbalancer.yaml -n kuard2

To get the loadbalancer ip you have to issue this command:

# kubectl describe service kuard2 -n kuard2
Name:                     kuard2
Namespace:                kuard2
Labels:                   <none>
Annotations:              <none>
Selector:                 app=kuard2
Type:                     LoadBalancer
IP Families:              <none>
IP:                       10.152.183.119
IPs:                      10.152.183.119
LoadBalancer Ingress:     192.168.178.230
Port:                     <unset>  80/TCP
TargetPort:               8080/TCP
NodePort:                 <unset>  31298/TCP
Endpoints:                10.1.243.220:8080,10.1.243.221:8080
Session Affinity:         None
External Traffic Policy:  Cluster
Events:
  Type    Reason        Age    From                Message
  ----    ------        ----   ----                -------
  Normal  IPAllocated   6m31s  metallb-controller  Assigned IP "192.168.178.230"
  Normal  nodeAssigned  6m31s  metallb-speaker     announcing from node "ubuntu"
And then your service is reachable with wget http://192.168.178.240:80 or any browser, which can connect to this ip.


Feb 28, 2021

Kubernetes: Building Kuard for Raspberry Pi (microk8s / ARM64)


In one of my last posts (click here) i used KUARD (kubernetes up and running demo) to check the livenessProbes of kubernetes.

In my posting i pulled the image from gcr.io/kuar-demo/kuard-arm64:3.

But what about building this image on myself?

First step: get the sources:

git clone https://github.com/kubernetes-up-and-running/kuard.git

Second step: run docker build:

cd kuard/
docker build . -t kuard:localbuild

But this fails with:

Step 13/14 : COPY --from=build /go/bin/kuard /kuard
COPY failed: stat /var/lib/docker/overlay2/60ba596c03e23fdfbca2216f495504fa2533a2f2e8cadd81a764a200c271de86/merged/go/bin/kuard: no such file or directory

What is going wrong here?

Inside the Dockerfile(s) there is ARCH=amd64

Just correct that with "sed -i 's/amd/arm/g' Dockerfile*"

After that the image is built without any problem:

Sending build context to Docker daemon  3.379MB
Step 1/14 : FROM golang:1.12-alpine AS build
 ---> 9d993b748f32
Step 2/14 : RUN apk update && apk upgrade && apk add --no-cache git nodejs bash npm
 ---> Using cache
 ---> 54400a0a06c5
Step 3/14 : RUN go get -u github.com/jteeuwen/go-bindata/...
 ---> Using cache
 ---> afe4c54a86c3
Step 4/14 : WORKDIR /go/src/github.com/kubernetes-up-and-running/kuard
 ---> Using cache
 ---> a51084750556
Step 5/14 : COPY . .
 ---> 568ef8c90354
Step 6/14 : ENV VERBOSE=0
 ---> Running in 0b7100c53ab0
Removing intermediate container 0b7100c53ab0
 ---> f22683c1c167
Step 7/14 : ENV PKG=github.com/kubernetes-up-and-running/kuard
 ---> Running in 8a0f880ea2ca
Removing intermediate container 8a0f880ea2ca
 ---> 49374a5b3802
Step 8/14 : ENV ARCH=arm64
 ---> Running in c6a08b2057d0
Removing intermediate container c6a08b2057d0
 ---> dd871e379a96
Step 9/14 : ENV VERSION=test
 ---> Running in 07e7c373ece7
Removing intermediate container 07e7c373ece7
 ---> 9dabd61d9cd0
Step 10/14 : RUN build/build.sh
 ---> Running in 66471550192c
Verbose: 0

> webpack-cli@3.2.1 postinstall /go/src/github.com/kubernetes-up-and-running/kuard/client/node_modules/webpack-cli
> lightercollective


     *** Thank you for using webpack-cli! ***

Please consider donating to our open collective
     to help us maintain this package.

  https://opencollective.com/webpack/donate

                    ***

added 819 packages from 505 contributors and audited 887 packages in 86.018s
found 683 vulnerabilities (428 low, 4 moderate, 251 high)
  run `npm audit fix` to fix them, or `npm audit` for details

> client@1.0.0 build /go/src/github.com/kubernetes-up-and-running/kuard/client
> webpack --mode=production

Browserslist: caniuse-lite is outdated. Please run next command `npm update caniuse-lite browserslist`
Hash: 52ca742bfd1307531486
Version: webpack 4.28.4
Time: 39644ms
Built at: 02/05/2021 6:48:35 PM
    Asset     Size  Chunks                    Chunk Names
bundle.js  333 KiB       0  [emitted]  [big]  main
Entrypoint main [big] = bundle.js
 [26] (webpack)/buildin/global.js 472 bytes {0} [built]
[228] (webpack)/buildin/module.js 497 bytes {0} [built]
[236] (webpack)/buildin/amd-options.js 80 bytes {0} [built]
[252] ./src/index.jsx + 12 modules 57.6 KiB {0} [built]
      | ./src/index.jsx 285 bytes [built]
      | ./src/app.jsx 7.79 KiB [built]
      | ./src/env.jsx 5.42 KiB [built]
      | ./src/mem.jsx 5.81 KiB [built]
      | ./src/probe.jsx 7.64 KiB [built]
      | ./src/dns.jsx 5.1 KiB [built]
      | ./src/keygen.jsx 7.69 KiB [built]
      | ./src/request.jsx 3.01 KiB [built]
      | ./src/highlightlink.jsx 1.37 KiB [built]
      | ./src/disconnected.jsx 3.6 KiB [built]
      | ./src/memq.jsx 6.33 KiB [built]
      | ./src/fetcherror.js 122 bytes [built]
      | ./src/markdown.jsx 3.46 KiB [built]
    + 249 hidden modules
go: finding github.com/prometheus/client_golang v0.9.2
go: finding github.com/spf13/pflag v1.0.3
go: finding github.com/miekg/dns v1.1.6
go: finding github.com/pkg/errors v0.8.1
go: finding github.com/elazarl/go-bindata-assetfs v1.0.0
go: finding github.com/BurntSushi/toml v0.3.1
go: finding github.com/felixge/httpsnoop v1.0.0
go: finding github.com/julienschmidt/httprouter v1.2.0
go: finding github.com/dustin/go-humanize v1.0.0
go: finding golang.org/x/crypto v0.0.0-20190313024323-a1f597ede03a
go: finding github.com/spf13/viper v1.3.2
go: finding github.com/prometheus/common v0.0.0-20181126121408-4724e9255275
go: finding github.com/prometheus/procfs v0.0.0-20181204211112-1dc9a6cbc91a
go: finding github.com/matttproud/golang_protobuf_extensions v1.0.1
go: finding github.com/beorn7/perks v0.0.0-20180321164747-3a771d992973
go: finding github.com/golang/protobuf v1.2.0
go: finding github.com/prometheus/client_model v0.0.0-20180712105110-5c3871d89910
go: finding golang.org/x/sync v0.0.0-20181108010431-42b317875d0f
go: finding golang.org/x/net v0.0.0-20181201002055-351d144fa1fc
go: finding golang.org/x/sys v0.0.0-20190215142949-d0b11bdaac8a
go: finding github.com/hashicorp/hcl v1.0.0
go: finding github.com/spf13/afero v1.1.2
go: finding github.com/coreos/go-semver v0.2.0
go: finding golang.org/x/crypto v0.0.0-20181203042331-505ab145d0a9
go: finding github.com/ugorji/go/codec v0.0.0-20181204163529-d75b2dcb6bc8
go: finding github.com/fsnotify/fsnotify v1.4.7
go: finding github.com/spf13/jwalterweatherman v1.0.0
go: finding github.com/coreos/etcd v3.3.10+incompatible
go: finding gopkg.in/yaml.v2 v2.2.2
go: finding golang.org/x/text v0.3.0
go: finding github.com/pelletier/go-toml v1.2.0
go: finding github.com/magiconair/properties v1.8.0
go: finding github.com/mitchellh/mapstructure v1.1.2
go: finding github.com/stretchr/testify v1.2.2
go: finding github.com/armon/consul-api v0.0.0-20180202201655-eb2c6b5be1b6
go: finding golang.org/x/sys v0.0.0-20181205085412-a5c9d58dba9a
go: finding github.com/coreos/go-etcd v2.0.0+incompatible
go: finding github.com/xordataexchange/crypt v0.0.3-0.20170626215501-b2862e3d0a77
go: finding github.com/spf13/cast v1.3.0
go: finding github.com/davecgh/go-spew v1.1.1
go: finding gopkg.in/check.v1 v0.0.0-20161208181325-20d25e280405
go: finding github.com/pmezard/go-difflib v1.0.0
go: downloading github.com/julienschmidt/httprouter v1.2.0
go: downloading github.com/pkg/errors v0.8.1
go: downloading github.com/miekg/dns v1.1.6
go: downloading github.com/spf13/viper v1.3.2
go: downloading github.com/felixge/httpsnoop v1.0.0
go: downloading github.com/spf13/pflag v1.0.3
go: downloading github.com/prometheus/client_golang v0.9.2
go: extracting github.com/pkg/errors v0.8.1
go: extracting github.com/julienschmidt/httprouter v1.2.0
go: extracting github.com/felixge/httpsnoop v1.0.0
go: extracting github.com/spf13/viper v1.3.2
go: downloading github.com/elazarl/go-bindata-assetfs v1.0.0
go: extracting github.com/elazarl/go-bindata-assetfs v1.0.0
go: extracting github.com/spf13/pflag v1.0.3
go: downloading gopkg.in/yaml.v2 v2.2.2
go: downloading github.com/dustin/go-humanize v1.0.0
go: extracting github.com/miekg/dns v1.1.6
go: downloading github.com/fsnotify/fsnotify v1.4.7
go: downloading github.com/hashicorp/hcl v1.0.0
go: extracting github.com/dustin/go-humanize v1.0.0
go: downloading github.com/magiconair/properties v1.8.0
go: downloading github.com/spf13/afero v1.1.2
go: extracting github.com/fsnotify/fsnotify v1.4.7
go: downloading golang.org/x/net v0.0.0-20181201002055-351d144fa1fc
go: downloading github.com/spf13/jwalterweatherman v1.0.0
go: downloading github.com/spf13/cast v1.3.0
go: extracting github.com/spf13/jwalterweatherman v1.0.0
go: extracting gopkg.in/yaml.v2 v2.2.2
go: extracting github.com/spf13/afero v1.1.2
go: extracting github.com/magiconair/properties v1.8.0
go: extracting github.com/prometheus/client_golang v0.9.2
go: downloading github.com/mitchellh/mapstructure v1.1.2
go: extracting github.com/spf13/cast v1.3.0
go: downloading golang.org/x/text v0.3.0
go: downloading golang.org/x/crypto v0.0.0-20190313024323-a1f597ede03a
go: extracting github.com/mitchellh/mapstructure v1.1.2
go: extracting github.com/hashicorp/hcl v1.0.0
go: downloading github.com/pelletier/go-toml v1.2.0
go: downloading golang.org/x/sys v0.0.0-20190215142949-d0b11bdaac8a
go: downloading github.com/prometheus/procfs v0.0.0-20181204211112-1dc9a6cbc91a
go: downloading github.com/prometheus/common v0.0.0-20181126121408-4724e9255275
go: extracting github.com/pelletier/go-toml v1.2.0
go: downloading github.com/prometheus/client_model v0.0.0-20180712105110-5c3871d89910
go: extracting github.com/prometheus/procfs v0.0.0-20181204211112-1dc9a6cbc91a
go: extracting github.com/prometheus/common v0.0.0-20181126121408-4724e9255275
go: downloading github.com/golang/protobuf v1.2.0
go: downloading github.com/beorn7/perks v0.0.0-20180321164747-3a771d992973
go: extracting github.com/prometheus/client_model v0.0.0-20180712105110-5c3871d89910
go: extracting github.com/beorn7/perks v0.0.0-20180321164747-3a771d992973
go: downloading github.com/matttproud/golang_protobuf_extensions v1.0.1
go: extracting github.com/matttproud/golang_protobuf_extensions v1.0.1
go: extracting github.com/golang/protobuf v1.2.0
go: extracting golang.org/x/crypto v0.0.0-20190313024323-a1f597ede03a
go: extracting golang.org/x/net v0.0.0-20181201002055-351d144fa1fc
go: extracting golang.org/x/sys v0.0.0-20190215142949-d0b11bdaac8a
go: extracting golang.org/x/text v0.3.0
Removing intermediate container 66471550192c
 ---> 236f3050bc93
Step 11/14 : FROM alpine
 ---> 1fca6fe4a1ec
Step 12/14 : USER nobody:nobody
 ---> Using cache
 ---> cabde1f6b77c
Step 13/14 : COPY --from=build /go/bin/kuard /kuard
 ---> 39e8b0af8cef
Step 14/14 : CMD [ "/kuard" ]
 ---> Running in ca867aeb43ba
Removing intermediate container ca867aeb43ba
 ---> e1cb3fd58eb4
Successfully built e1cb3fd58eb4
Successfully tagged kuard:localbuild

Feb 24, 2021

Kubernetes: Run a docker image as pod or deployment?

 If you want to run a docker image inside kubernetes you can at least choose two ways:

  1. pod
  2. deployment

The first is done with these commands:

kubectl create namespace kuard
kubectl run kuard --image=gcr.io/kuar-demo/kuard-arm64:3 -n kuard --port 8080
kubectl expose pod kuard --type=NodePort --port=8080 -n kuard

To  run the image inside a deployment the commands look very similar:

kubectl create namespace kuard2
kubectl create deployment kuard2 --image=gcr.io/kuar-demo/kuard-arm64:3 -n kuard2
kubectl expose deployment kuard2 -n kuard2 --type=NodePort --port=8080

Both is done with three commands, but what is the difference:

# kubectl get all -n kuard
NAME        READY   STATUS    RESTARTS   AGE
pod/kuard   1/1     Running   5          3d21h

NAME            TYPE       CLUSTER-IP       EXTERNAL-IP   PORT(S)          AGE
service/kuard   NodePort   10.152.183.227   <none>        8080:32047/TCP   3d20h

 versus

# kubectl get all -n kuard2
NAME                        READY   STATUS    RESTARTS   AGE
pod/kuard2-f8fd6497-4f7bc   1/1     Running   0          5m38s

NAME             TYPE       CLUSTER-IP       EXTERNAL-IP   PORT(S)          AGE
service/kuard2   NodePort   10.152.183.233   <none>        8080:32627/TCP   4m32s

NAME                     READY   UP-TO-DATE   AVAILABLE   AGE
deployment.apps/kuard2   1/1     1            1           5m39s

NAME                              DESIRED   CURRENT   READY   AGE
replicaset.apps/kuard2-f8fd6497   1         1         1       5m38s

So as you clearly can see, a deployment also configure a deployment and a replicaset in addition. But this is not really a deployment you want to do in such unconfigured way (remember: livenessProbes & readinessProbes can only be configured with kubctl apply + YAML). But you can get an template via 

kubectl get deployments kuard2 -n kuard2 -o yaml

which you can use for configuring all parameters - so this is easier than writing the complete YAML manually.

Feb 13, 2021

Kubernetes: LivenessProbes - first check

One key feature of kubernetes is, that unhealthy pods will be restarted. How can this be tested?

First you should deploy KUARD (kubernetes up and runnind demo). With this docker image you can check the restart feature easily:

(To deploy kuard read this posting, but there a some small differences)

# kubectl create namespace kuard
namespace/kuard created

But then you can not use the kubectl run because there is no commandline parameter to add the livenessProbe configuration. So you have to write a yaml file:

apiVersion: v1
kind: Pod
metadata:
  creationTimestamp: null
  labels:
    run: kuard
  name: kuard
  namespace: kuard
spec:
  containers:
  - image: gcr.io/kuar-demo/kuard-arm64:3
    name: kuard
    livenessProbe:
      httpGet:
        path: /healthy
        port: 8080
      initialDelaySeconds: 5
      timeoutSeconds: 1
      periodSeconds: 10
      failureThreshold: 3

    ports:
    - containerPort: 8080
    resources: {}
  dnsPolicy: ClusterFirst
  restartPolicy: Always
status: {}
and then run

# kubectl apply -f kuard.yaml -n kuard

The exposed port will stay (this posting) untouched, so you can reach your kuard over http.

So go to the tab "liveness probe" and you will see:

Now click on "Fail" and the livenessProbe will get a http 500:

 And after 3 retries you will see:

and the command line will show 1 restart:

# kubectl get all -n kuard
NAME        READY   STATUS    RESTARTS   AGE
pod/kuard   1/1     Running   1          118s

NAME            TYPE       CLUSTER-IP       EXTERNAL-IP   PORT(S)          AGE
service/kuard   NodePort   10.152.183.227   <none>        8080:32047/TCP   3d21h
Really cool - but really annoying, that this could not be configured via CLI but only per YAML.


Feb 6, 2021

Microk8s: Running KUARD (Kubernetes Up And Running Demo) on a small cluster

There is a cool demo application, which you can use to check your kubernetes settings. This application is called kuard (https://github.com/kubernetes-up-and-running/kuard):

To get it running in a way that you can deinstall it easily run the following commands:

# kubectl create namespace kuard
namespace/kuard created
You can deploy it via "kubectl run" or create a YAML with "kubectl run ... --dry-run=client --output=yaml" and deloy via "kubectl apply":

#kubectl run kuard --image=gcr.io/kuar-demo/kuard-arm64:3 -n kuard --port 8080 --dry-run=client --output=yaml
apiVersion: v1
kind: Pod
metadata:
  creationTimestamp: null
  labels:
    run: kuard
  name: kuard
  namespace: kuard
spec:
  containers:
  - image: gcr.io/kuar-demo/kuard-arm64:3
    name: kuard
    ports:
    - containerPort: 8080
    resources: {}
  dnsPolicy: ClusterFirst
  restartPolicy: Always
status: {}
or 

# kubectl run kuard --image=gcr.io/kuar-demo/kuard-arm64:3 -n kuard --port 8080

To expose it in your cluster run:

# kubectl expose pod kuard --type=NodePort --port=8080 -n kuard
service/kuard exposed

And then check the port via

# kubectl get all -n kuard
NAME        READY   STATUS    RESTARTS   AGE
pod/kuard   1/1     Running   5          3d20h

NAME            TYPE       CLUSTER-IP       EXTERNAL-IP   PORT(S)          AGE
service/kuard   NodePort   10.152.183.227   <none>        8080:32047/TCP   3d20h

The number after 8080: is the port you can use (http://zigbee:32047/) 

With kuard you can run DNS checks on the pods or browse the filesystem, to check things... You can even set the status for the liveness and readyness probes.


Feb 4, 2021

Kubernetes: publishing services - clusterip vs. nodeport vs. loadbalancer and connecting to the serivces

In my posting http://dietrichschroff.blogspot.com/2020/11/kubernetes-with-microk8s-first-steps-to.html i described how to expose a NGINX on a kubernetes cluster, so that i was able open the NGINX page with a browser which was not located on one of the kubernetes nodes.

After reading around here the fundamentals, why this worked and what alternatives can be used.

The command

kubectl expose deployment web --type=NodePort --port=80

can be used with the following types:

https://kubernetes.io/docs/concepts/services-networking/service/#publishing-services-service-types

So exposing to a clusterip is only exposing your service internally. If you want to access this from the outside, the follow this tutorial: https://kubernetes.io/docs/tasks/access-application-cluster/port-forward-access-application-cluster/ but this is only a temporary solution.

Exposing to external without any additional component: Just use nodeport (e.g. follog my posting: http://dietrichschroff.blogspot.com/2020/11/kubernetes-with-microk8s-first-steps-to.html )

Loadbalancer uses a loadbalancer from Azure or AWS or ... (take a look here: https://kubernetes.io/docs/tutorials/stateless-application/expose-external-ip-address/ )

ExternalName adds a DNS-name to the loadbalancer IP of type Loadbalancer.


Jan 30, 2021

Microk8s: rejoining a node after a reinstall of microk8s


If you are running a microk8s kubernetes cluster, you can hit the scenario, that you lost one node and you have to reinstall the complete os or just the microk8s.

In this case you want to join this node once again to your cluster. But removing the node does not work, because the rest of the cluster can not reach the node (because it is gone...):

root@zigbee:/home/ubuntu# microk8s.remove-node ubuntu
Removal failed. Node ubuntu is registered with dqlite. Please, run first 'microk8s leave' on the departing node.
If the node is not available anymore and will never attempt to join the cluster in the future use the '--force' flag
to unregister the node while removing it.

The solution is given in the failed answer: just add "--force"

root@zigbee:/home/ubuntu# microk8s.remove-node ubuntu --force
root@zigbee:/home/ubuntu# microk8s.add-node
From the node you wish to join to this cluster, run the following:
microk8s join 192.168.178.57:25000/de0736090ce0055e45aff1c5897deba0
If the node you are adding is not reachable through the default interface you can use one of the following:
 microk8s join 192.168.178.57:25000/de0736090ce0055e45aff1c5897deba0
 microk8s join 172.17.0.1:25000/de0736090ce0055e45aff1c5897deba0
 microk8s join 10.1.190.192:25000/de0736090ce0055e45aff1c5897deba0

And then the join works without any problem:

root@ubuntu:/home/ubuntu# microk8s join 192.168.178.57:25000/de0736090ce0055e45aff1c5897deba0
Contacting cluster at 192.168.178.57
Waiting for this node to finish joining the cluster. ..  
 

Jan 26, 2021

MicroK8s: kubectl get componentstatus deprecated - etcd status missing


If you want to check the health of the basic components with

kubectl get componentstatuses 
Warning: v1 ComponentStatus is deprecated in v1.19+
NAME                 STATUS    MESSAGE   ERROR
controller-manager   Healthy   ok        
scheduler            Healthy   ok       

Then etcd is missing.

This is a problem of a change in the api of kuberentes https://kubernetes.io/docs/setup/release/notes/#deprecation-5


The command to check etcd is:

kubectl get --raw='/readyz?verbose'
[+]ping ok
[+]log ok
[+]etcd ok
[+]informer-sync ok
[+]poststarthook/start-kube-apiserver-admission-initializer ok
[+]poststarthook/generic-apiserver-start-informers ok
[+]poststarthook/priority-and-fairness-config-consumer ok
[+]poststarthook/priority-and-fairness-filter ok
[+]poststarthook/start-apiextensions-informers ok
[+]poststarthook/start-apiextensions-controllers ok
[+]poststarthook/crd-informer-synced ok
[+]poststarthook/bootstrap-controller ok
[+]poststarthook/scheduling/bootstrap-system-priority-classes ok
[+]poststarthook/priority-and-fairness-config-producer ok
[+]poststarthook/start-cluster-authentication-info-controller ok
[+]poststarthook/aggregator-reload-proxy-client-cert ok
[+]poststarthook/start-kube-aggregator-informers ok
[+]poststarthook/apiservice-registration-controller ok
[+]poststarthook/apiservice-status-available-controller ok
[+]poststarthook/kube-apiserver-autoregistration ok
[+]autoregister-completion ok
[+]poststarthook/apiservice-openapi-controller ok
[+]shutdown ok
readyz check passed


Jan 23, 2021

Microk8s: publishing the dashboard (reachable from remote/internet)


If you enable the dashboard on a microk8s cluster (or single node) you can follow this tutorial: https://microk8s.io/docs/addon-dashboard

The problem is, the command

microk8s kubectl port-forward -n kube-system service/kubernetes-dashboard 10443:443

has to be reexecuted every time you restart your node, which you use to access the dashboard.

A better configuration can be done this way: Run the following command and change 

type: ClusterIP -->   type: NodePort

kubectl -n kube-system edit service kubernetes-dashboard

# Please edit the object below. Lines beginning with a '#' will be ignored,
# and an empty file will abort the edit. If an error occurs while saving this file will be
# reopened with the relevant failures.
#
apiVersion: v1
kind: Service
metadata:
  annotations:
    kubectl.kubernetes.io/last-applied-configuration: |
      {"apiVersion":"v1","kind":"Service","metadata":{"annotations":{},"labels":{"k8s-app":"kubernetes-dashboard"},"name":"kubernetes-dashboard","namespace":"kube-system"},"spec":{"ports":[{"port":443,"targetPort":8443}],"selector":{"k8s-app":"kubernetes-dashboard"}}}
  creationTimestamp: "2021-01-22T21:19:24Z"
  labels:
    k8s-app: kubernetes-dashboard
  name: kubernetes-dashboard
  namespace: kube-system
  resourceVersion: "3599"
  selfLink: /api/v1/namespaces/kube-system/services/kubernetes-dashboard
  uid: 19496d44-c454-4f55-967c-432504e0401b
spec:
  clusterIP: 10.152.183.81
  clusterIPs:
  - 10.152.183.81
  ports:
  - port: 443
    protocol: TCP
    targetPort: 8443
  selector:
    k8s-app: kubernetes-dashboard
  sessionAffinity: None
  type: ClusterIP
status:
  loadBalancer: {}
Then run

root@ubuntu:/home/ubuntu# kubectl -n kube-system get service kubernetes-dashboard
NAME                   TYPE       CLUSTER-IP      EXTERNAL-IP   PORT(S)         AGE
kubernetes-dashboard   NodePort   10.152.183.81   <none>        443:30713/TCP   4m14s

After that you can access the dashboard over the port which is given behind the 443: - in my case https://zigbee:30713


Jan 22, 2021

Microk8s: No such file or directory: '/var/snap/microk8s/1908/var/kubernetes/backend.backup/info.yaml' while joining a cluster

 Kubernetes cluster with microk8s on raspberry pi

If you want to join a node and you get the following error:

microk8s join 192.168.178.57:25000/6a3ce1d2f0105245209e7e5e412a7e54

Contacting cluster at 192.168.178.57
Traceback (most recent call last):
  File "/snap/microk8s/1908/scripts/cluster/join.py", line 967, in <module>
    join_dqlite(connection_parts)
  File "/snap/microk8s/1908/scripts/cluster/join.py", line 900, in join_dqlite
    update_dqlite(info["cluster_cert"], info["cluster_key"], info["voters"], hostname_override)
  File "/snap/microk8s/1908/scripts/cluster/join.py", line 818, in update_dqlite
    with open("{}/info.yaml".format(cluster_backup_dir)) as f:
FileNotFoundError: [Errno 2] No such file or directory: '/var/snap/microk8s/1908/var/kubernetes/backend.backup/info.yaml'

 This error happens, if you have not enabled dns on your nodes.

So just run "microk8s.enable dns" on every machine:

microk8s.enable dns

Enabling DNS
Applying manifest
serviceaccount/coredns created
configmap/coredns created
deployment.apps/coredns created
service/kube-dns created
clusterrole.rbac.authorization.k8s.io/coredns created
clusterrolebinding.rbac.authorization.k8s.io/coredns created
Restarting kubelet
Adding argument --cluster-domain to nodes.
Configuring node 192.168.178.57
Adding argument --cluster-dns to nodes.
Configuring node 192.168.178.57
Restarting nodes.
Configuring node 192.168.178.57
DNS is enabled

And after that the join will work like expected:

root@ubuntu:/home/ubuntu# microk8s join 192.168.178.57:25000/ed3f57a3641581964cad43f0ceb2b526
Contacting cluster at 192.168.178.57
Waiting for this node to finish joining the cluster. ..  
root@ubuntu:/home/ubuntu# kubectl get nodes
NAME     STATUS   ROLES    AGE     VERSION
ubuntu   Ready    <none>   3m35s   v1.20.1-34+97978f80232b01
zigbee   Ready    <none>   37m     v1.20.1-34+97978f80232b01