Showing posts with label Kernel. Show all posts

Jun 5, 2020

Lineage OS: Building my own system from scratch...

For my Samsung J5 is was only able to find a lineage 15.1 image but no lineage 16 or even 17.
So i decided to build the image on my own.

I followed this guide:
https://github.com/lineage-doge/device-j5y17lte/tree/lineage-16.0

But on this page the roomservice.xml is wrong:


Just change it to


The rest was following the instructions:
mkdir -p android/lineage-16.0
cd android/lineage-16.0
repo init -u git://github.com/LineageOS/android.git -b lineage-16.0
repo sync

Create .repo/local_manifests/roomservice.xml with the content shown above.
Then run "repo sync" once again.

Most important point it to extract the binaries from your device. To get a background just read this:
https://wiki.lineageos.org/extracting_blobs_from_zips.html


I extracted /system from my Android device via TWRP (under advanced you can find a file explorer and this can copy the partition to your sd card).
After that point STOCK_ROM_DIR to your sd card and run:
cd device/samsung/j5y17lte
STOCK_ROM_DIR=/path/to/system ./extract-files.sh
Now we are ready to rumble:
cd ../../
source build/envsetup.sh
brunch lineage_j5y17lte-userdebug
But after some minutes:
LD      kernel/built-in.o
/media/schroff/895337b7-c4eb-44a4-9063-00f629e5149f/lineage-16.0/kernel/samsung/exynos7870/drivers/net/wireless/Makefile:62: android version 1: 90000
/media/schroff/895337b7-c4eb-44a4-9063-00f629e5149f/lineage-16.0/kernel/samsung/exynos7870/drivers/net/wireless/Makefile:63: MAJOR_VERSION version 1: 9
/media/schroff/895337b7-c4eb-44a4-9063-00f629e5149f/lineage-16.0/kernel/samsung/exynos7870/drivers/net/wireless/Makefile:107: platform version 3 : 9.0.0
/media/schroff/895337b7-c4eb-44a4-9063-00f629e5149f/lineage-16.0/kernel/samsung/exynos7870/drivers/net/wireless/Makefile:108: MAJOR_VERSION version 3: 9
  LD      drivers/built-in.o
make[1]: Leaving directory '/media/schroff/895337b7-c4eb-44a4-9063-00f629e5149f/lineage-16.0/out/target/product/j5y17lte/obj/KERNEL_OBJ'
Makefile:145: recipe for target 'sub-make' failed
make: *** [sub-make] Error 2
make: Leaving directory '/media/schroff/895337b7-c4eb-44a4-9063-00f629e5149f/lineage-16.0/kernel/samsung/exynos7870'
[  1% 555/35382] target StaticLib: libv8src_32 (/media/schroff/895337b7-c4eb-44a4-...arget/product/j5y17lte/obj_arm/STATIC_LIBRARIES/libv8src_intermediates/libv8src.a)
ninja: build stopped: subcommand failed.
19:21:20 ninja failed with: exit status 1

#### failed to build some targets (05:29 (mm:ss)) ####
But this error is easy to fix:
cd ~/android/lineage-16.0/out/target/product/j5y17lte/obj/KERNEL_OBJ/firmware/tsp_imagis
cp ~/android/lineage-16.0/kernel/samsung/exynos7870/firmware/tsp_imagis/ist3038h_a3x_cmcs.bin .
~/android/lineage-16.0/kernel/samsung/exynos7870/firmware/tsp_imagis/ist3038h_a3x.fw .
schroff@zerberus:~/android/lineage-16.0/out/target/product/j5y17lte/obj/KERNEL_OBJ/firmware/tsp_imagis$

and try once again!

And after a while:
  Imgdiff Stats Report 
========================

Compressing system.new.dat with brotli
  running:  brotli --quality=6 --output=/tmp/tmpAOkKFk/system.new.dat.br /tmp/tmpAOkKFk/system.new.dat
using prebuilt boot.img from BOOTABLE_IMAGES...
  running:  java -Xmx2048m -Djava.library.path=/media/schroff/895337b7-c4eb-44a4-9063-00f629e5149f/lineage-16.0/out/host/linux-x86/lib64 -jar /media/schroff/895337b7-c4eb-44a4-9063-00f629e5149f/lineage-16.0/out/host/linux-x86/framework/signapk.jar -w build/target/product/security/testkey.x509.pem build/target/product/security/testkey.pk8 /tmp/tmptUxdfx.zip /tmp/tmpSgxnBy.zip
  running:  zip -d /tmp/tmpSgxnBy.zip META-INF/com/android/metadata
  running:  java -Xmx2048m -Djava.library.path=/media/schroff/895337b7-c4eb-44a4-9063-00f629e5149f/lineage-16.0/out/host/linux-x86/lib64 -jar /media/schroff/895337b7-c4eb-44a4-9063-00f629e5149f/lineage-16.0/out/host/linux-x86/framework/signapk.jar -w build/target/product/security/testkey.x509.pem build/target/product/security/testkey.pk8 /tmp/tmpSgxnBy.zip /media/schroff/895337b7-c4eb-44a4-9063-00f629e5149f/lineage-16.0/out/target/product/j5y17lte/lineage_j5y17lte-ota-eng.schroff.zip
done.
[100% 453/453] build bacon
Package Complete: /media/schroff/895337b7-c4eb-44a4-9063-00f629e5149f/lineage-16.0/out/target/product/j5y17lte/lineage-16.0-20200502-UNOFFICIAL-j5y17lte.zip

#### build completed successfully (27:31 (mm:ss)) ####


Jun 21, 2019

Ubuntu Server: How to activate kernel dumps

If you are running ubuntu server, you can add kdump on your system to write kernel dumps in case of sudden reboots etc.

Installing is very easy:
root@ubuntuserver:/etc# apt install linux-crashdump
Reading package lists... Done
Building dependency tree       
Reading state information... Done
The following additional packages will be installed:
  binutils binutils-common binutils-x86-64-linux-gnu crash kdump-tools kexec-tools libbinutils libdw1 libsnappy1v5 makedumpfile
Suggested packages:
  binutils-doc
The following NEW packages will be installed:
  binutils binutils-common binutils-x86-64-linux-gnu crash kdump-tools kexec-tools libbinutils libdw1 libsnappy1v5 linux-crashdump makedumpfile
0 upgraded, 11 newly installed, 0 to remove and 43 not upgraded.
Need to get 2,636 B/5,774 kB of archives.
After this operation, 26.0 MB of additional disk space will be used.
Do you want to continue? [Y/n] 
Get:1 http://archive.ubuntu.com/ubuntu bionic-updates/main amd64 linux-crashdump amd64 4.15.0.46.48 [2,636 B]
Fetched 2,636 B in 0s (28.1 kB/s)     
Preconfiguring packages ...
Selecting previously unselected package binutils-common:amd64.
(Reading database ... 66831 files and directories currently installed.)
Preparing to unpack .../00-binutils-common_2.30-21ubuntu1~18.04_amd64.deb ...
Unpacking binutils-common:amd64 (2.30-21ubuntu1~18.04) ...
Selecting previously unselected package libbinutils:amd64.
Preparing to unpack .../01-libbinutils_2.30-21ubuntu1~18.04_amd64.deb ...
Unpacking libbinutils:amd64 (2.30-21ubuntu1~18.04) ...
Selecting previously unselected package binutils-x86-64-linux-gnu.
Preparing to unpack .../02-binutils-x86-64-linux-gnu_2.30-21ubuntu1~18.04_amd64.deb ...
Unpacking binutils-x86-64-linux-gnu (2.30-21ubuntu1~18.04) ...
Selecting previously unselected package binutils.
Preparing to unpack .../03-binutils_2.30-21ubuntu1~18.04_amd64.deb ...
Unpacking binutils (2.30-21ubuntu1~18.04) ...
Selecting previously unselected package libsnappy1v5:amd64.
Preparing to unpack .../04-libsnappy1v5_1.1.7-1_amd64.deb ...
Unpacking libsnappy1v5:amd64 (1.1.7-1) ...
Selecting previously unselected package crash.
Preparing to unpack .../05-crash_7.2.1-1ubuntu2_amd64.deb ...
Unpacking crash (7.2.1-1ubuntu2) ...
Selecting previously unselected package kexec-tools.
Preparing to unpack .../06-kexec-tools_1%3a2.0.16-1ubuntu1_amd64.deb ...
Unpacking kexec-tools (1:2.0.16-1ubuntu1) ...
Selecting previously unselected package libdw1:amd64.
Preparing to unpack .../07-libdw1_0.170-0.4_amd64.deb ...
Unpacking libdw1:amd64 (0.170-0.4) ...
Selecting previously unselected package makedumpfile.
Preparing to unpack .../08-makedumpfile_1%3a1.6.3-2_amd64.deb ...
Unpacking makedumpfile (1:1.6.3-2) ...
Selecting previously unselected package kdump-tools.
Preparing to unpack .../09-kdump-tools_1%3a1.6.3-2_amd64.deb ...
Unpacking kdump-tools (1:1.6.3-2) ...
Selecting previously unselected package linux-crashdump.
Preparing to unpack .../10-linux-crashdump_4.15.0.46.48_amd64.deb ...
Unpacking linux-crashdump (4.15.0.46.48) ...
Processing triggers for ureadahead (0.100.0-20) ...
Setting up libdw1:amd64 (0.170-0.4) ...
Setting up kexec-tools (1:2.0.16-1ubuntu1) ...
Generating /etc/default/kexec...
Setting up binutils-common:amd64 (2.30-21ubuntu1~18.04) ...
Processing triggers for libc-bin (2.27-3ubuntu1) ...
Setting up makedumpfile (1:1.6.3-2) ...
Setting up libsnappy1v5:amd64 (1.1.7-1) ...
Processing triggers for systemd (237-3ubuntu10.12) ...
Processing triggers for man-db (2.8.3-2ubuntu0.1) ...
Setting up libbinutils:amd64 (2.30-21ubuntu1~18.04) ...
Setting up kdump-tools (1:1.6.3-2) ...

Creating config file /etc/default/kdump-tools with new version
Sourcing file `/etc/default/grub'
Sourcing file `/etc/default/grub.d/50-curtin-settings.cfg'
Sourcing file `/etc/default/grub.d/kdump-tools.cfg'
Generating grub configuration file ...
Found linux image: /boot/vmlinuz-4.15.0-45-generic
Found initrd image: /boot/initrd.img-4.15.0-45-generic
done
Created symlink /etc/systemd/system/multi-user.target.wants/kdump-tools.service → /lib/systemd/system/kdump-tools.service.
Setting up linux-crashdump (4.15.0.46.48) ...
Setting up binutils-x86-64-linux-gnu (2.30-21ubuntu1~18.04) ...
Setting up binutils (2.30-21ubuntu1~18.04) ...
Setting up crash (7.2.1-1ubuntu2) ...
Processing triggers for ureadahead (0.100.0-20) ...
Processing triggers for libc-bin (2.27-3ubuntu1) ...
Processing triggers for systemd (237-3ubuntu10.12) ...
Within the installation you have to answer these questions:


After the installation the following parameter is added to the kernel cmdline:
grep -r crash /boot* |grep cfg
/boot/grub/grub.cfg:        linux    /boot/vmlinuz-4.15.0-46-generic root=UUID=a83c2a94-91c4-461a-b6a4-c7a81422a857 ro  maybe-ubiquity crashkernel=384M-:128M
/boot/grub/grub.cfg:            linux    /boot/vmlinuz-4.15.0-46-generic root=UUID=a83c2a94-91c4-461a-b6a4-c7a81422a857 ro  maybe-ubiquity crashkernel=384M-:128M
with
crashkernel=:[,:,...][@offset]
    range=start-[end] 'start' is inclusive and 'end' is exclusive 

The configuration is done via /etc/default/kdump-tools. Here the parameter to control the directory to dump the core into:

cat /etc/default/kdump-tools  |grep DIR
# KDUMP_COREDIR - local path to save the vmcore to.
KDUMP_COREDIR="/var/crash"
Next step is to reboot and verify the kernel cmdline.

#cat /proc/cmdline 
BOOT_IMAGE=/boot/vmlinuz-4.15.0-46-generic root=UUID=a83c2a94-91c4-461a-b6a4-c7a81422a857 ro maybe-ubiquity crashkernel=384M-:128M


To get a coredump just use the following commands:
root@ubuntuserver:/etc# sysctl -w kernel.sysrq=1
kernel.sysrq = 1
root@ubuntuserver:/etc# echo c > /proc/sysrq-trigger

Dec 7, 2018

Ubuntu: if WLAN is gone after an update and lspci lists no wlan devices

On my ubuntu laptop after an update the WLAN networking was gone. First check was to boot into Windows and check wether the WLAN devices is still working:
The WLAN still worked with Windows, so the worst case (hardware error) did not hit me ;-)

So i switched back to Ubuntu and tried the following:

$ lspci -nnk | grep -iA2 net;
02:00.0 Ethernet controller [0200]: Realtek Semiconductor Co., Ltd. RTL8111/8168/8411 PCI Express Gigabit Ethernet Controller [10ec:8168] (rev 15)
    Subsystem: Acer Incorporated [ALI] RTL8111/8168/8411 PCI Express Gigabit Ethernet Controller [1025:104c]
    Kernel driver in use: r8169
    Kernel modules: r8169
Very strange - the WLAN network adapter was not even listed with lspci!
Another check shows:
$ lshw|grep -iA2 network
WARNUNG: Sie sollten dieses Programm mit Systemverwalterrechten (root) ausführen.
           *-network
                Beschreibung: Ethernet interface
                Produkt: RTL8111/8168/8411 PCI Express Gigabit Ethernet Controller
It look like the hardware controller is missing, but the check with Windows explicitly showed, that the WLAN is still ok.

The solution was to run:
apt-get install bcmwl-kernel-source
(After connecting the laptop via ethernet to my router)

Then the commands showed up again with the WLAN adapter:
$ lspci -nnk | grep -iA2 net;
02:00.0 Ethernet controller [0200]: Realtek Semiconductor Co., Ltd. RTL8111/8168/8411 PCI Express Gigabit Ethernet Controller [10ec:8168] (rev 15)
    Subsystem: Acer Incorporated [ALI] RTL8111/8168/8411 PCI Express Gigabit Ethernet Controller [1025:104c]
    Kernel driver in use: r8169
    Kernel modules: r8169
03:00.0 Network controller [0280]: Qualcomm Atheros QCA6174 802.11ac Wireless Network Adapter [168c:003e] (rev 32)
    Subsystem: Lite-On Communications Inc QCA6174 802.11ac Wireless Network Adapter [11ad:0807]
    Kernel driver in use: ath10k_pci
    Kernel modules: ath10k_pci, wl

$ lshw|grep -iA2 network

WARNUNG: Sie sollten dieses Programm mit Systemverwalterrechten (root) ausführen.

           *-network

                Beschreibung: Ethernet interface

                Produkt: RTL8111/8168/8411 PCI Express Gigabit Ethernet Controller

--

           *-network

                Beschreibung: Kabellose Verbindung

                Produkt: QCA6174 802.11ac Wireless Network Adapter

                Hersteller: Qualcomm Atheros

                Physische ID: 0

I found the following with google:
https://ubuntuforums.org/showthread.php?t=1411216


So let's try this:
# apt-mark hold bcmwl-kernel-source
bcmwl-kernel-source auf Halten gesetzt.

Aug 11, 2018

Ubuntu / Linux: WLAN connections fails with "denied authentication (status 17)"

During holidays i was not able to connect my laptop to the WLAN.
The /var/log/syslog showed the following:
Jul 15 13:45:20 pc wpa_supplicant[935]: wlp3s0: SME: Trying to authenticate with 14:9d:09:fe:a4:b3 (SSID='HUAWEI BTV' freq=2437 MHz)
Jul 15 13:45:20 pc kernel: [ 6972.826888] wlp3s0: authenticate with 14:9d:09:fe:a4:b3
Jul 15 13:45:20 pc NetworkManager[797]:   [1531655120.4746] device (wlp3s0): supplicant interface state: disconnected -> authenticating
Jul 15 13:45:20 pc kernel: [ 6972.829942] wlp3s0: send auth to 14:9d:09:fe:a4:b3 (try 1/3)
Jul 15 13:45:20 pc kernel: [ 6972.833433] wlp3s0: 14:9d:09:fe:a4:b3 denied authentication (status 17)
Jul 15 13:45:20 pc wpa_supplicant[935]: wlp3s0: CTRL-EVENT-SSID-TEMP-DISABLED id=0 ssid="HUAWEI BTV" auth_failures=1 duration=10 reason=CONN_FAILED
Jul 15 13:45:20 pc NetworkManager[797]:   [1531655120.5031] device (wlp3s0): supplicant interface state: authenticating -> disconnected
Jul 15 13:45:20 pc org.freedesktop.Notifications[1248]: ** (notify-osd:1448): WARNING **: dnd_is_idle_inhibited(): got error "The name org.gnome.SessionManager was not provided by any .service files"
Hmmm.
STATUS 17
What the hell does this error code tell me?

The explanation was quite easy: The WLAN was provided by a tablet via tethering. And Android limits the number of devices in such a WLAN to 5.
After removing one of the other devices everything worked fine...


May 18, 2018

Virtualbox: vboxdrv.sh: failed & Run 'make oldconfig && make prepare'

After updating to ubuntu 18.04 i had to reinstall virtualbox:


# dpkg -i virtualbox-5.2_5.2.10-122088~Debian~stretch_amd64.deb 
Vormals nicht ausgewähltes Paket virtualbox-5.2 wird gewählt.
(Lese Datenbank ... 378316 Dateien und Verzeichnisse sind derzeit installiert.)
Vorbereitung zum Entpacken von virtualbox-5.2_5.2.10-122088~Debian~stretch_amd64.deb ...
Entpacken von virtualbox-5.2 (5.2.10-122088~Debian~stretch) ...
virtualbox-5.2 (5.2.10-122088~Debian~stretch) wird eingerichtet ...
addgroup: Die Gruppe »vboxusers« existiert bereits als Systemgruppe. Programmende.
vboxdrv.sh: failed: Look at /var/log/vbox-install.log to find out what went wrong.

There were problems setting up VirtualBox.  To re-start the set-up process, run
  /sbin/vboxconfig
as root.
Trigger für systemd (237-3ubuntu10) werden verarbeitet ...
Trigger für ureadahead (0.100.0-20) werden verarbeitet ...
Trigger für gnome-menus (3.13.3-11ubuntu1) werden verarbeitet ...
Trigger für bamfdaemon (0.5.3+18.04.20180207.2-0ubuntu1) werden verarbeitet ...
Rebuilding /usr/share/applications/bamf-2.index...
Trigger für desktop-file-utils (0.23-1ubuntu3) werden verarbeitet ...
Trigger für mime-support (3.60ubuntu1) werden verarbeitet ...
Trigger für hicolor-icon-theme (0.17-2) werden verarbeitet ...
Trigger für shared-mime-info (1.9-2) werden verarbeitet ...
But this just failed with the following error (i am running my own kernel because of suspend to disk issues) inside /var/log/vbox-install.log:

test -e include/generated/autoconf.h -a -e include/config/auto.conf || (        \
echo >&2;                            \
echo >&2 "  ERROR: Kernel configuration is invalid.";        \
echo >&2 "         include/generated/autoconf.h or include/config/auto.conf are missing.";\
echo >&2 "         Run 'make oldconfig && make prepare' on kernel src to fix it.";    \
echo >&2 ;                            \
/bin/false)
mkdir -p /lib/modules/4.17.0-rc3/misc

and at the end:

/tmp/vbox.0/linux/VBoxPci-linux.c:92:40: error: implicit declaration of function ‘pci_get_bus_and_slot’; did you mean ‘pci_get_domain_bus_and_slot’? [-Werror=implicit-function-declaration]
 # define PCI_DEV_GET_SLOT(bus, devfn)  pci_get_bus_and_slot(bus, devfn)
                                        ^
/tmp/vbox.0/linux/VBoxPci-linux.c:397:15: note: in expansion of macro ‘PCI_DEV_GET_SLOT’
     pPciDev = PCI_DEV_GET_SLOT(uBus, uDevFn);
               ^~~~~~~~~~~~~~~~
/tmp/vbox.0/linux/VBoxPci-linux.c:397:13: warning: assignment makes pointer from integer without a cast [-Wint-conversion]
     pPciDev = PCI_DEV_GET_SLOT(uBus, uDevFn);
             ^
/tmp/vbox.0/linux/VBoxPci-linux.c: In function ‘vboxPciOsDevInit’:
/tmp/vbox.0/linux/VBoxPci-linux.c:648:17: warning: assignment makes pointer from integer without a cast [-Wint-conversion]
         pPciDev = PCI_DEV_GET_SLOT((pIns->HostPciAddress) >> 8,
                 ^
cc1: some warnings being treated as errors
scripts/Makefile.build:312: recipe for target '/tmp/vbox.0/linux/VBoxPci-linux.o' failed
make[2]: *** [/tmp/vbox.0/linux/VBoxPci-linux.o] Error 1
Makefile:1568: recipe for target '_module_/tmp/vbox.0' failed
make[1]: *** [_module_/tmp/vbox.0] Error 2
/tmp/vbox.0/Makefile.include.footer:101: recipe for target 'vboxpci' failed
make: *** [vboxpci] Error 2

Starting virtualbox shows:


The virtual machine 'Docker on Alpine LInux' has terminated unexpectedly during startup with exit code 1 (0x1).

Fehlercode:NS_ERROR_FAILURE (0x80004005)
Komponente:MachineWrap
Interface:IMachine {85cd948e-a71f-4289-281e-0ca7ad48cd89}

There are many postings out there how to fix this.
But is easier than everything written there:

Change to /lib/modules/4.17.0-rc3/misc and type:
modprobe vboxdrv
modprobe vboxnetadp
modprobe vboxnetflt

And after that everything works like expected.


Feb 25, 2018

Ubuntu Kernel: Adding a new menuentry as default before menuentry 'Ubuntu' (grub)

After the problem with s2disk/hibernate on my Ubuntu 17.10 i wanted to change the grub boot menu:
I wanted to add my new default kernel at the beginning  - before the 'Ubuntu' menuentry.


Adding the menuentry inside /boot/grub/grub.cfg does not work, because after the first kernel update the command update-grub will overwrite all changes.

Easiest way:
Go to /etc/grub.d/ and move

mv 40_custom 09_custom
Inside 09_custom add your new menuentry (just copy the one you want from /boot/grub/grub.cfg):
root@zerberus:/etc/grub.d# cat 09_custom
#!/bin/sh
exec tail -n +3 $0
# This file provides an easy way to add custom menu entries.  Simply type the
# menu entries you want to add after this comment.  Be careful not to change
# the 'exec tail' line above.
        menuentry 'Ubuntu, mit Linux 4.13.0-17-generic' --class ubuntu --class gnu-linux --class gnu --class os $menuentry_id_option 'gnulinux-4.13.0-17-generic-advanced-40d34826-4f8a-aefc' {
                recordfail
                load_video
                gfxmode $linux_gfx_mode
                insmod gzio
                if [ x$grub_platform = xxen ]; then insmod xzio; insmod lzopio; fi
                insmod part_gpt
                insmod ext2
                set root='hd0,gpt5'
                if [ x$feature_platform_search_hint = xy ]; then
                  search --no-floppy --fs-uuid --set=root --hint-bios=hd0,gpt5 --hint-efi=hd0,gpt5 --hint-baremetal=ahci0,gpt5  40d34826-4f8a-aefc-d422f755d339
                else
                  search --no-floppy --fs-uuid --set=root 40d34826-4f8a-aefc                fi
                echo    'Linux 4.13.0-17-generic wird geladen …'
                linux   /boot/vmlinuz-4.13.0-17-generic root=UUID=40d34826-4f8a-aefc ro  noplymouth resume=UUID=709f3f5a-5e73-b42d-b93915cea971
                echo    'Initiale Ramdisk wird geladen …'
                initrd  /boot/initrd.img-4.13.0-17-generic
        }
 And then run update-grub once again and you are done....


Feb 3, 2018

Ubuntu 17.10: s2disk/hibernate broken with kernel 4.13.0-32

Last week my notebook refused to startup after s2disk/hibernate. The resume process started up to 100% and then the screen went black and everything stopped...

Hmm...
First idea: Something disappeared inside the grub configuration.

But this was okay.

After nearly one hour my last try was booting an old kernel. And with
schroff@zerberus:/boot$ uname -a
Linux zerberus 4.13.0-17-generic #20-Ubuntu SMP Mon Nov 6 10:04:08 UTC 2017 x86_64 x86_64 x86_64 GNU/Linux
s2disk and resume worked again...


Oct 7, 2017

Oracle Linux: How to change from uek to Red Hat compatible kernel

After a standard installation of Oracle Linux the uek kernel is bootet by default (unbreakable enterprise kernel).
# uname -a
Linux localhost.localdomain 4.1.12-94.3.9.el7uek.x86_64 #2 SMP Fri Jul 14 20:09:40 PDT 2017 x86_64 x86_64 x86_64 GNU/Linux
This behaviour can be changed with these commands:
First you have to get the linenumber of your new target kernel:
# grep ^menuentry /etc/grub2.cfg  | xargs printf '%s\n' |grep Oracle
Oracle Linux Server (4.1.12-94.3.9.el7uek.x86_64 with Unbreakable Enterprise Kernel) 7.4
Oracle Linux Server (3.10.0-693.el7.x86_64 with Linux) 7.4
Oracle Linux Server (0-rescue-2071bdecbf9a49e4b17d57fb4df518e8 with Linux) 7.4
In my case it is number 2: (3.10.0-....). But the numbering starts with 0. So i have to configure 1:
[root@localhost oracle]# grub2-set-default 1
[root@localhost oracle]# grub2-mkconfig -o /boot/grub2/grub.cfg
Generating grub configuration file ...
Found linux image: /boot/vmlinuz-4.1.12-94.3.9.el7uek.x86_64
Found initrd image: /boot/initramfs-4.1.12-94.3.9.el7uek.x86_64.img
Found linux image: /boot/vmlinuz-3.10.0-693.el7.x86_64
Found initrd image: /boot/initramfs-3.10.0-693.el7.x86_64.img
Found linux image: /boot/vmlinuz-0-rescue-2071bdecbf9a49e4b17d57fb4df518e8
Found initrd image: /boot/initramfs-0-rescue-2071bdecbf9a49e4b17d57fb4df518e8.img
done
And after a reboot you will get:
$ uname -a
Linux localhost.localdomain 3.10.0-693.el7.x86_64 #1 SMP Wed Aug 2 06:49:08 PDT 2017 x86_64 x86_64 x86_64 GNU/Linux

Please note: After this change you have to recompile virtualbox guest additions.

Jan 15, 2017

Ubuntu: Hibernate/Suspend to disk: Resume problem with ATI Radeon R7

On a new Lenovo laptop i had some issues with supsend/resume.
I installed tux on ice and the suspend process worked, but the resume just freezed after some seconds.

First step to solve this problem was to stop the graphics (/etc/init.d/lightdm stop) and try it again.

This attempt worked without a problem, so it was clear: the resume problem is a issue with the graphic card:
laptop:~$ lspci
[...]
01:00.0 Display controller: Advanced Micro Devices, Inc. [AMD/ATI] Topaz XT [Radeon R7 M260/M265] (rev ff9)
[...]
So i tried to disable the modesettings with grub. I changed in /etc/default/grub

GRUB_CMDLINE_LINUX_DEFAULT="resume=/dev/sda9 quiet splash"
to
 GRUB_CMDLINE_LINUX_DEFAULT="resume=/dev/sda9 quiet splash  nomodeset"
and then the command
update-grub
And after that everything worked...


Here an explanation from https://ubuntuforums.org/showthread.php?t=1613132:
nomodeset
The newest kernels have moved the video mode setting into the kernel. So all the programming of the hardware specific clock rates and registers on the video card happen in the kernel rather than in the X driver when the X server starts.. This makes it possible to have high resolution nice looking splash (boot) screens and flicker free transitions from boot splash to login screen. Unfortunately, on some cards this doesnt work properly and you end up with a black screen. Adding the nomodeset parameter instructs the kernel to not load video drivers and use BIOS modes instead until X is loaded.

Note that this option is sometimes needed for nVidia cards when using the default "nouveau" drivers. Installing proprietary nvidia drivers usually makes this option no longer necessary, so it may not be needed to make this option permanent, just for one boot until you installed the nvidia drivers.


Nov 1, 2016

Debian dist-upgrade: from 7(wheezy) to 8(jessie): udev...

I was running my own kernel on my laptop. But doing the upgrade from debian 7 to 8, i ran in the following problem:
Since release 198, udev requires support for the following features in
the running kernel:

- inotify(2)            (CONFIG_INOTIFY_USER)
- signalfd(2)           (CONFIG_SIGNALFD)
- accept4(2)
- open_by_handle_at(2)  (CONFIG_FHANDLE)
- timerfd_create(2)     (CONFIG_TIMERFD)
- epoll_create(2)       (CONFIG_EPOLL)
Since release 176, udev requires support for the following features in
the running kernel:

- devtmpfs         (CONFIG_DEVTMPFS)

Please upgrade your kernel before or while upgrading udev.

AT YOUR OWN RISK, you can force the installation of this version of udev
WHICH DOES NOT WORK WITH YOUR RUNNING KERNEL AND WILL BREAK YOUR SYSTEM
AT THE NEXT REBOOT by creating the /etc/udev/kernel-upgrade file.
There is always a safer way to upgrade, do not try this unless you
understand what you are doing!


dpkg: Fehler beim Bearbeiten des Archivs /var/cache/apt/archives/udev_215-17+deb8u5_i386.deb (--unpack):
 Unterprozess neues pre-installation-Skript gab den Fehlerwert 1 zurück
So i changed to the default kernel of debian, but with this one systems was not able to mount the partitions, because the old kernel mounted the disk on /dev/hda and the new one on /dev/sda.
So i had to rewrite the /etc/fstab and after that, the dist-upgrade could continue...

Debian dist-upgrade: Laptop suspends 30s after boot / startup

After i moved to jessie (Debian 8) my laptop moved to suspend to RAM about half a minute after startup.
There was no message in the logfiles and even worse the resume does not work at all...
The configuration for the suspend was in here:
/etc/systemd/logind.conf:
 [Login]
#NAutoVTs=6
#ReserveVT=6
#KillUserProcesses=no
#KillOnlyUsers=
#KillExcludeUsers=root
#InhibitDelayMaxSec=5
#HandlePowerKey=poweroff
HandleSuspendKey=ignore
#HandleHibernateKey=hibernate
HandleLidSwitch=ignore
#PowerKeyIgnoreInhibited=no
#SuspendKeyIgnoreInhibited=no
#HibernateKeyIgnoreInhibited=no
#LidSwitchIgnoreInhibited=yes
#IdleAction=ignore
#IdleActionSec=30min
#RuntimeDirectorySize=10%
#RemoveIPC=yes
After changing the lines "HandleLidSwitch" and "HandleSuspendKey" to ignore and one more restart the laptops stays alive and no unwanted suspend is happening anymore.
That was a strange behaviour, because my first guess was overheating. But after waiting 10 minutes the laptop was really cool, so overheating was not the point...

Debian dist-upgrade: ipw2200 firmwares missing...

After the dist-upgrade the ipw2200 wireless chipset drivers are missing.
Grrrr...
No more internet access - so i had to use a good old LAN cable ;-)

The fix was very easy:
apt-get install firmware-ipw22x00
rmmod ipw2200
modprobe ipw2200
 and the wireless network is up again...

May 20, 2014

Mounting VMWare-Volumes/Disks with Debian

Some time ago a vmware server did not recognize any more a data disk. This disk was formatted with vmfs v3 (enter the vmware server via ssh and type mount..). First thing i did, was creating an image of this disk, to play around without any danger of data loss.

There is a good article how to mount vmfs, but on debian i had to install the package otherosfs.

After i installed this package, i got the following error:

root@debian:/tmp# vmfs-fuse image /mnt/vm
VMFS VolInfo: invalid magic number 0x00000000
VMFS: Unable to read volume information
Trying to find partitions 
But: Do not worry about this error message. The image was mounted on /mnt/vm and accessible without any problem...

Mar 30, 2014

Ubuntu upgrade to 12.04: screen only works with 1024x768

After upgrading a laptop-system to 12.04 (precise pangolin) X only starts with a resolution of 1024x768 and not with 1366x768.
I followed many postings and tried many things:
  • add new resolution with xrandr (here)
  • create a xorg.conf file (here)
  • add new drivers (here)
  • ...
But there was only one thing wrong: /etc/default/grub

After changing the following line everything worked:
GRUB_CMDLINE_LINUX_DEFAULT="quiet splash i915.modeset=0
to
GRUB_CMDLINE_LINUX_DEFAULT="quiet splash"
(i added i915.modeset=0  because with the older ubuntu version hibernate does not work and this configuration fixed it. [link])

Jun 23, 2012

ndiswrapper broken after upgrading to ubuntu 12.04: FATAL module ndiswrapper not found

After upgrading from 10.04 to 12.04 via shell (# do-release-upgrade) everything went well, except the network access...
(Networking was not integrated on my old sony z600, so i had to use an USB WLAN stick via ndiswrapper).

So what is wrong?
First i tried
sudo ndiswrapper -l
and this look quite good. Driver and hardware present.
Next:
sudo modprobe ndiswrapper
FATAL: Module ndiswrapper not found
Ok, with version 12.04 a new kernel is shipped (3.?) and this does not recognize the ndiswrapper.ko kernel module.
After running
sudo depmod -a
still the same problem...
But then i did
sudo apt-get install ndiswrapper-dkms
Now everything went well:
sudo modprobe ndiswrapper && sudo ndiswrapper -ma
and the network was up again and after a reboot it was still working....


Jun 20, 2012

Installing Ubuntu on a Sony Z600 (no internal CD-Rom and no USB boot available)

At weekend i tried to install Ubuntu on my 11 year old notebook. A Sony Z600? It was some kind of ultrabook 11 years ago:
  • Pentium M (no wireless chipset onboard ;-)
  • Display: 1024x768
  • 384 MB RAM
  • 40 GB HDD
  • ATI Radeon Mobility (8MB)
  • 1.7 kg
  • max. power consumption 19.5V x 3.0A < 60W
  • 2 x USB, 1 x Firewire
  • Jogdial
  • external CD-Rom over PCMCIA
  • shipped with Windows 2000

There is no information from sony on the web available.

Some years ago i already installed Debian on this laptop. There are many guides out there (like this or this). But writing a floppy disk is not really option. So let's try using the CD...

But there was the first suprise:

Ubuntu 12.04 does not install on Pentium M (missing PAE feature -> link or link). So let's step back to 10.04 and the boot option ide2=0x180,0x386.

But this does not work... After booting the installation kernel from CD the kernel does not recognize the CD-Rom drive anymore. Booting via USB-CD-Rom-drive is not possible, because the notebook is far to old to boot via USB...

But then i found the magic boot option:

INSTALL_MEDIA_DEV=/dev/sda1

After adding this, the kernel boots from CD-Rom and after that it asks for the boot medium attached to one of the USB ports via USB-CD-Rom! Really nice option but installing Ubuntu 10.04 over USB version 1.1 is not really fast ;-)


Jul 30, 2011

Linux VPN Client: disconnect every 600s (10min)

You are trying to connect to a Cisco Pix or Cisco ASA with a Linux PC and the connection disconnects after 10 minutes?
You tried
You found after googling around the following hints:
  • rekeying problem (not implemented for Linux)
  • missing open ports in your firewall (500 UDP, 4500 UDP, 10000 UDP)
  • write a automatic restart script
  • set MTU size on tun0 below 1300
  • disable dead pear detection (--dpd-idle 0)
    this is done via port 500
  • ...
None of this tips worked. And now?
Let's take a look at the debug messages from vpnc:
vpnc -no-detach --debug 2 profile0
after 10 minutes:
S7.2 QM_packet2 send_receive
S7.3 QM_packet2 validate type
vpnc: no response from target
Anything learned? The connection is dead again with no response from target...
Where are this response packets? Let's take a look at wireshark:


Hmmm
Dst Port 500...
Let's try the following:
vpnc --no-detach --debug 2 --dh dh5 gip2
and voila: no disconnects anymore...

Why?
Read this link:
The Diffie-Hellman Group 5 feature enables group 5
on all platforms that support crypto images. Group 5 specifies the
1536-bit Diffie-Hellman group, which is a method of establishing a
shared key over an insecure medium.

So my advise:
If your VPN disconnects after some minutes, try some of the cli-options of vpnc. Or ask your administrator, which Diffie-Hellman group is configured...

Here the cli-option (via vpnc --long-help)
Usage: vpnc [--version] [--print-config] [--help] [--long-help] [options] [config files]

Options:
--gateway <ip/hostname>
IP/name of your IPSec gateway
conf-variable: IPSec gateway <ip/hostname>

--id <ASCII string>
your group name
conf-variable: IPSec ID <ASCII string>

(configfile only option)
your group password (cleartext)
conf-variable: IPSec secret <ASCII string>

(configfile only option)
your group password (obfuscated)
conf-variable: IPSec obfuscated secret <hex string>

--username <ASCII string>
your username
conf-variable: Xauth username <ASCII string>

(configfile only option)
your password (cleartext)
conf-variable: Xauth password <ASCII string>

(configfile only option)
your password (obfuscated)
conf-variable: Xauth obfuscated password <hex string>

--domain <ASCII string>
(NT-) Domain name for authentication
conf-variable: Domain <ASCII string>

--xauth-inter
enable interactive extended authentication (for challenge response auth)

--dpd-idle
conf-variable: Xauth interactive

--vendor <cisco/netscreen>
vendor of your IPSec gateway
Default: cisco
conf-variable: Vendor <cisco/netscreen>

--natt-mode <natt/none/force-natt/cisco-udp>
Which NAT-Traversal Method to use:
* natt -- NAT-T as defined in RFC3947
* none -- disable use of any NAT-T method
* force-natt -- always use NAT-T encapsulation even
without presence of a NAT device
(useful if the OS captures all ESP traffic)
* cisco-udp -- Cisco proprietary UDP encapsulation, commonly over Port 10000
Note: cisco-tcp encapsulation is not yet supported
Default: natt
conf-variable: NAT Traversal Mode <natt/none/force-natt/cisco-udp>

--script <command>
command is executed using system() to configure the interface,
routing and so on. Device name, IP, etc. are passed using enviroment
variables, see README. This script is executed right after ISAKMP is
done, but before tunneling is enabled. It is called when vpnc
terminates, too
Default: /etc/vpnc/vpnc-script
conf-variable: Script <command>

--dh <dh1/dh2/dh5>
name of the IKE DH Group
Default: dh2
conf-variable: IKE DH Group <dh1/dh2/dh5>

--pfs <nopfs/dh1/dh2/dh5/server>
Diffie-Hellman group to use for PFS
Default: server
conf-variable: Perfect Forward Secrecy <nopfs/dh1/dh2/dh5/server>

--enable-1des
enables weak single DES encryption
conf-variable: Enable Single DES

--enable-no-encryption
enables using no encryption for data traffic (key exchanged must be encrypted)
conf-variable: Enable no encryption

--application-version <ASCII string>
Application Version to report. Note: Default string is generated at runtime.
Default: Cisco Systems VPN Client 0.5.3:Linux
conf-variable: Application version <ASCII string>

--ifname <ASCII string>
visible name of the TUN/TAP interface
conf-variable: Interface name <ASCII string>

--ifmode <tun/tap>
mode of TUN/TAP interface:
* tun: virtual point to point interface (default)
* tap: virtual ethernet interface
Default: tun
conf-variable: Interface mode <tun/tap>

--debug <0/1/2/3/99>
Show verbose debug messages
* 0: Do not print debug information.
* 1: Print minimal debug information.
* 2: Show statemachine and packet/payload type information.
* 3: Dump everything exluding authentication data.
* 99: Dump everything INCLUDING AUTHENTICATION data (e.g. PASSWORDS).
conf-variable: Debug <0/1/2/3/99>

--no-detach
Don't detach from the console after login
conf-variable: No Detach

Report bugs to vpnc@unix-ag.uni-kl.de


Mar 24, 2011

Debian 6: IPSec-VPN?! -> Network-Manager

After changing to Debian 6 i had to recompile the Cisco IPSec kernel module (cisco_ipsec.ko). But i ended up with:
hades:/packages/vpnclient# ./vpn_install
Cisco Systems VPN Client Version 4.8.02 (0030) Linux Installer
Copyright (C) 1998-2006 Cisco Systems, Inc. All Rights Reserved.
....
Making module
make -C /lib/modules/2.6.37.3/build SUBDIRS=/packages/vpnclient modules
make[1]: Entering directory `/usr/src/linux-2.6.37.3'
CC [M] /packages/vpnclient/linuxcniapi.o
/packages/vpnclient/linuxcniapi.c:14:28: error: linux/autoconf.h: Datei oder Verzeichnis nicht gefunden
make[2]: *** [/packages/vpnclient/linuxcniapi.o] Fehler 1
make[1]: *** [_module_/packages/vpnclient] Fehler 2
make[1]: Leaving directory `/usr/src/linux-2.6.37.3'
make: *** [default] Fehler 2
Failed to make module "cisco_ipsec.ko".
Ok... this does not work anymore.
But the network-manager has one tab labelled vpn... What about using this one?

The first try was not successful, because the "add"-button was disabled. After some googling around there was a hint to install the following package:
apt-get install network-manager-pptp-gnome
The button was enabled but only Point-to-Point-Tunneling-Protocol could be chosen. A lookup on http://packages.debian.org showed the following packages in addition:
apt-get install network-manager-openvpn-gnome
apt-get install network-manager-vpnc-gnome
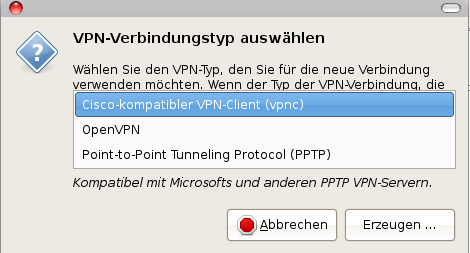
After installing these packages the following vpn-types were selectable:

And with choosing vpnc the following dialog was shown

and after filling in all parameters, the vpn connection was established without any problem...


Feb 2, 2011

IPv6: Statless autoconfiguration not working on wireless networks...

If you are running a AVM FritzBox, you can easily enable IPv6 support on this FritzBox (take a look at this posting). But this is only half the way ;-).
I checked the following clients:
  • Ubuntu: autoconfiguration works just out of the box...
  • On windows client you have to enable IPv6 support and after that everything works fine...
  • Debian: there are no router solicitation (ra) messages sent... ;-(
    [and of course no ipv6-connectivity...]
After some checks it was obvious, that the wpa_supplicant-mechanism is the problem. The initialization of wpa needs up to 10s and the ra messages are sent at a time, when the wpa encryption is not set up and the kernel does not resend them.

But there is an easy workaround to resend this messages:
rdisc6 eth1
hades:/etc/network# rdisc6 eth1
Soliciting ff02::2 (ff02::2) on eth1...

Hop limit                 :          255 (      0xff)
Stateful address conf.    :           No
Stateful other conf.      :          Yes
Router preference         :       medium
Router lifetime           :         1800 (0x00000708) seconds
Reachable time            :  unspecified (0x00000000)
Retransmit time           :  unspecified (0x00000000)
 Prefix                   : 2002:5ed5:8422::/64
  Valid time              :         7200 (0x00001c20) seconds
  Pref. time              :         3600 (0x00000e10) seconds
 Recursive DNS server     : fd00::21c:55ff:fe1a:2632
  DNS server lifetime     :         1200 (0x000004b0) seconds
 MTU                      :         1280 bytes (valid)
 Source link-layer address: 00:1C:55:1A:26:32
 from fe80::21c:55ff:fe1a:2632
After that ifconfig shows a auto configured ipv6 address:
inet6-Adresse: 2002:5dd2:84d3:0:210:ff:fe0d:1244/64 Gültigkeitsbereich:Global
and the routes are set like they should:
2002:5dd2:84d3:0:210:ff:fe0d:1244/128 ::                         Un    0    1    351 lo
2002:5dd2:84d3::/64                   ::                         UAe   256  0      4 eth1
::/0                                  fe80::21c:55ff:fe1a:2632   UGDAe 1024 0     42 eth1

...
Just open http://test-ipv6.com:

May 15, 2010

Building Virtualbox from scratch

Virtualbox can be used with two licenses. Here the official statement from the website:
The full VirtualBox package is available in binary (executable) form free of charge from the Downloads page. This version is free for personal use and evaluation under the terms of the VirtualBox Personal Use and Evaluation License.
If, instead, you wish to purchase licenses for enterprise use and/or enterprise support for VirtualBox, please do not hesitate to contact your Sun representative or buy online from the Web Store
The VirtualBox Open Source Edition (OSE) is the one that has been released under the GPL and comes with complete source code. It is functionally equivalent to the full VirtualBox package, except for a few features that primarily target enterprise customers. This gives us a chance to generate revenue to fund further development of VirtualBox.

So if you want to use Virtualbox under GPL you have to build it from scratch. This is not very difficult:

  1. Download the OSE (Open Source Edition) from Virtualbox
  2. Take a look at the build instructions
  3. If you are running Debian, you have to install the following packages:
    apt-get install bin86 bcc iasl libxml2-dev libxslt-dev liborbit-de libcurl4-openssl-dev libpng12-dev libsdl1.2-dev libxcursor-dev libxmu-dev python-dev libpulse-dev libcap-dev libqt4-opengl-dev
  4. Unpack the tarball
    tar -jxf VirtualBox-3.1.8-OSE.tar.bz2
  5. Configure the package
    ./configure -help
    Usage: ./configure [OPTIONS]...

    Configuration:
    -h, --help display this help and exit
    --nofatal don't abort on errors
    --disable-xpcom disable XPCOM and related stuff
    --disable-python disable python bindings
    --disable-sdl-ttf disable SDL_ttf detection
    --disable-alsa disable the ALSA sound backend
    --disable-pulse disable the PulseAudio backend
    --disable-dbus don't use DBus and hal for hardware detection
    --disable-kmods don't build Linux kernel modules (host and guest)
    --disable-opengl disable OpenGL support
    --enable-webservice enable the webservice stuff
    --disable-hardening don't be strict about /dev/vboxdrv access
    --build-libxml2 build libxml2 from sources
    --build-libxslt build libxslt from sources
    --setup-wine setup a Wine directory and register the hhc hack

    Paths:
    --with-gcc=PATH location of the gcc compiler [gcc]
    --with-g++=PATH location of the g++ compiler [g++]
    --with-kbuild=DIR kbuild directory [/tmp/VirtualBox-3.1.8_OSE/kBuild]
    --with-iasl=PATH location of the iasl compiler [iasl]
    --with-mkisofs=PATH location of mkisofs [mkisofs]
    --with-linux=DIR Linux kernel source directory [/lib/modules/2.6.28.7/build]
    --with-qt-dir=DIR directory for Qt4 headers/libraries [pkgconfig]
    --with-openssl-dir=DIR directory for OpenSSL headers/libraries
    --out-path=PATH the folder to which configuration and build output
    should go

    Build type:
    -d, --build-debug build with debugging symbols and assertions
    --build-profile build with profiling support
    --build-headless build headless (without any GUI frontend)
  6. schroff@hades:$ ./configure
    Checking for environment: Determined build machine: linux.x86, target machine: linux.x86, OK.
    Checking for kBuild: found, OK.
    Checking for gcc: found version 4.3.2, OK.
    Checking for as86: found version 0.16.17, OK.
    Checking for bcc: found version 0.16.17, OK.
    Checking for iasl: found version 20061109, OK.
    Checking for xslt: found, OK.
    Checking for pthread: found, OK.
    Checking for libxml2: found version 2.6.32, OK.
    Checking for libxslt: found version 1.1.24, OK.
    Checking for libIDL: found version 0.6.8, OK.
    Checking for ssl: found version OpenSSL 0.9.8g 19 Oct 2007, OK.
    Checking for libcurl: found version 7.18.2, OK.
    Checking for zlib: found version 1.2.3.3, OK.
    Checking for libpng: found version 1.2.27, OK.
    Checking for SDL: found version 1.2.12, OK.
    Checking for X libraries: found, OK.
    Checking for Xcursor: found, OK.
    Checking for Xmu: found, OK.
    Checking for Mesa / GLU: found version 1.2, OK.
    Checking for Qt4: found version 4.4.3, OK.
    Checking for Qt4 devtools: found version 4.4.3, OK.
    Checking for python support: found version 2.5.2, OK.
    Checking for static stc++ library: found, OK.
    Checking for Linux kernel sources: found version 2.6.28, OK.
    Checking for ALSA: found version 1.0.16, OK.
    Checking for PulseAudio: found version 0.9.10 API version 11, OK.
    Checking for libcap library: found, OK.
    Checking for compiler.h: compiler.h not found, OK.

    Successfully generated '/tmp/VirtualBox-3.1.8_OSE/AutoConfig.kmk' and '/tmp/VirtualBox-3.1.8_OSE/env.sh'.
    Source '/tmp/VirtualBox-3.1.8_OSE/env.sh' once before you start to build VBox:

    source /tmp/VirtualBox-3.1.8_OSE/env.sh
    kmk

    To compile the kernel modules, do:

    cd ./out/linux.x86/release/bin/src
    make


    +++ WARNING +++ WARNING +++ WARNING +++ WARNING +++ WARNING +++ WARNING +++
    Hardening is enabled which means that the VBox binaries will not run from
    the binary directory. The binaries have to be installed suid root and some
    more prerequisites have to be fulfilled which is normally done by installing
    the final package. For development, the hardening feature can be disabled
    by specifying the --disable-hardening parameter. Please never disable that
    feature for the final distribution!
    +++ WARNING +++ WARNING +++ WARNING +++ WARNING +++ WARNING +++ WARNING +++

    Enjoy!
  7. source ./env.sh 
  8. kmk all
  9. cd out/linux.x86/release/bin/components
    ln -s ../VBoxDDU.so .
    ln -s ../VBoxREM.so .
    ln -s ../VBoxRT.so .
    ln -s ../VBoxVMM.so .
    ln -s ../VBoxXPCOM.so .
  10. Last but not least follow the instructions here to build the kernel modules und to run Virtualbox...
If this was to much work, just do the three steps here and use official binaries...